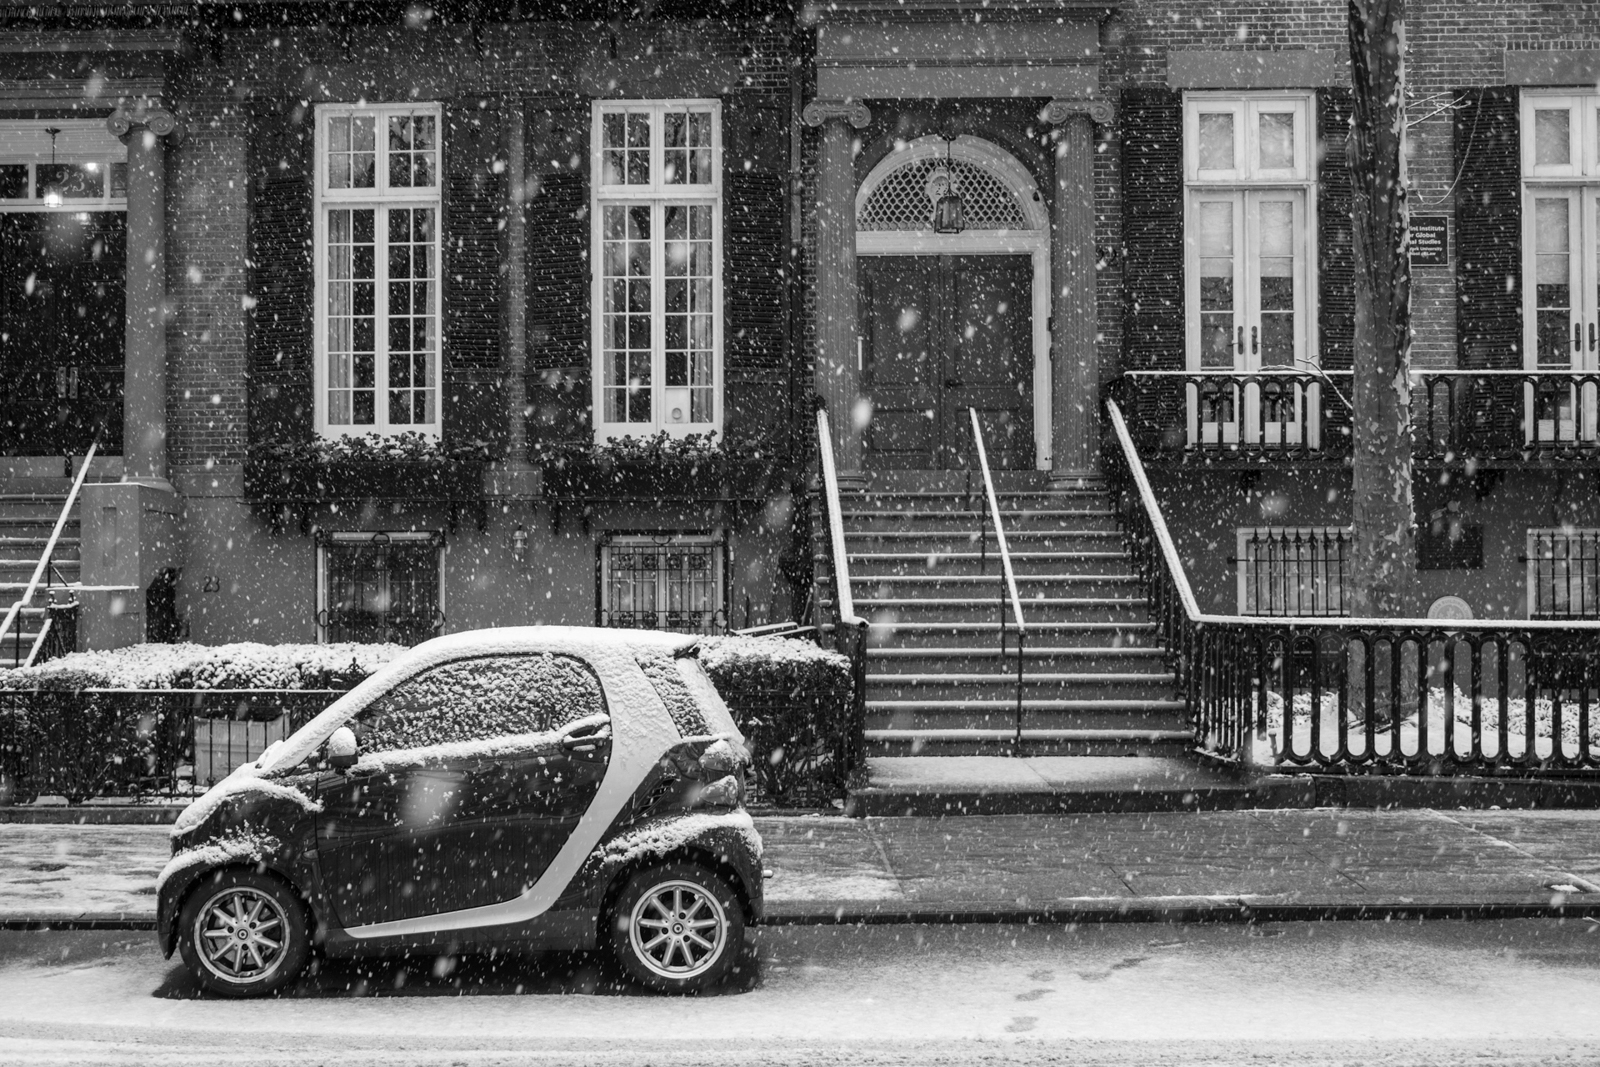
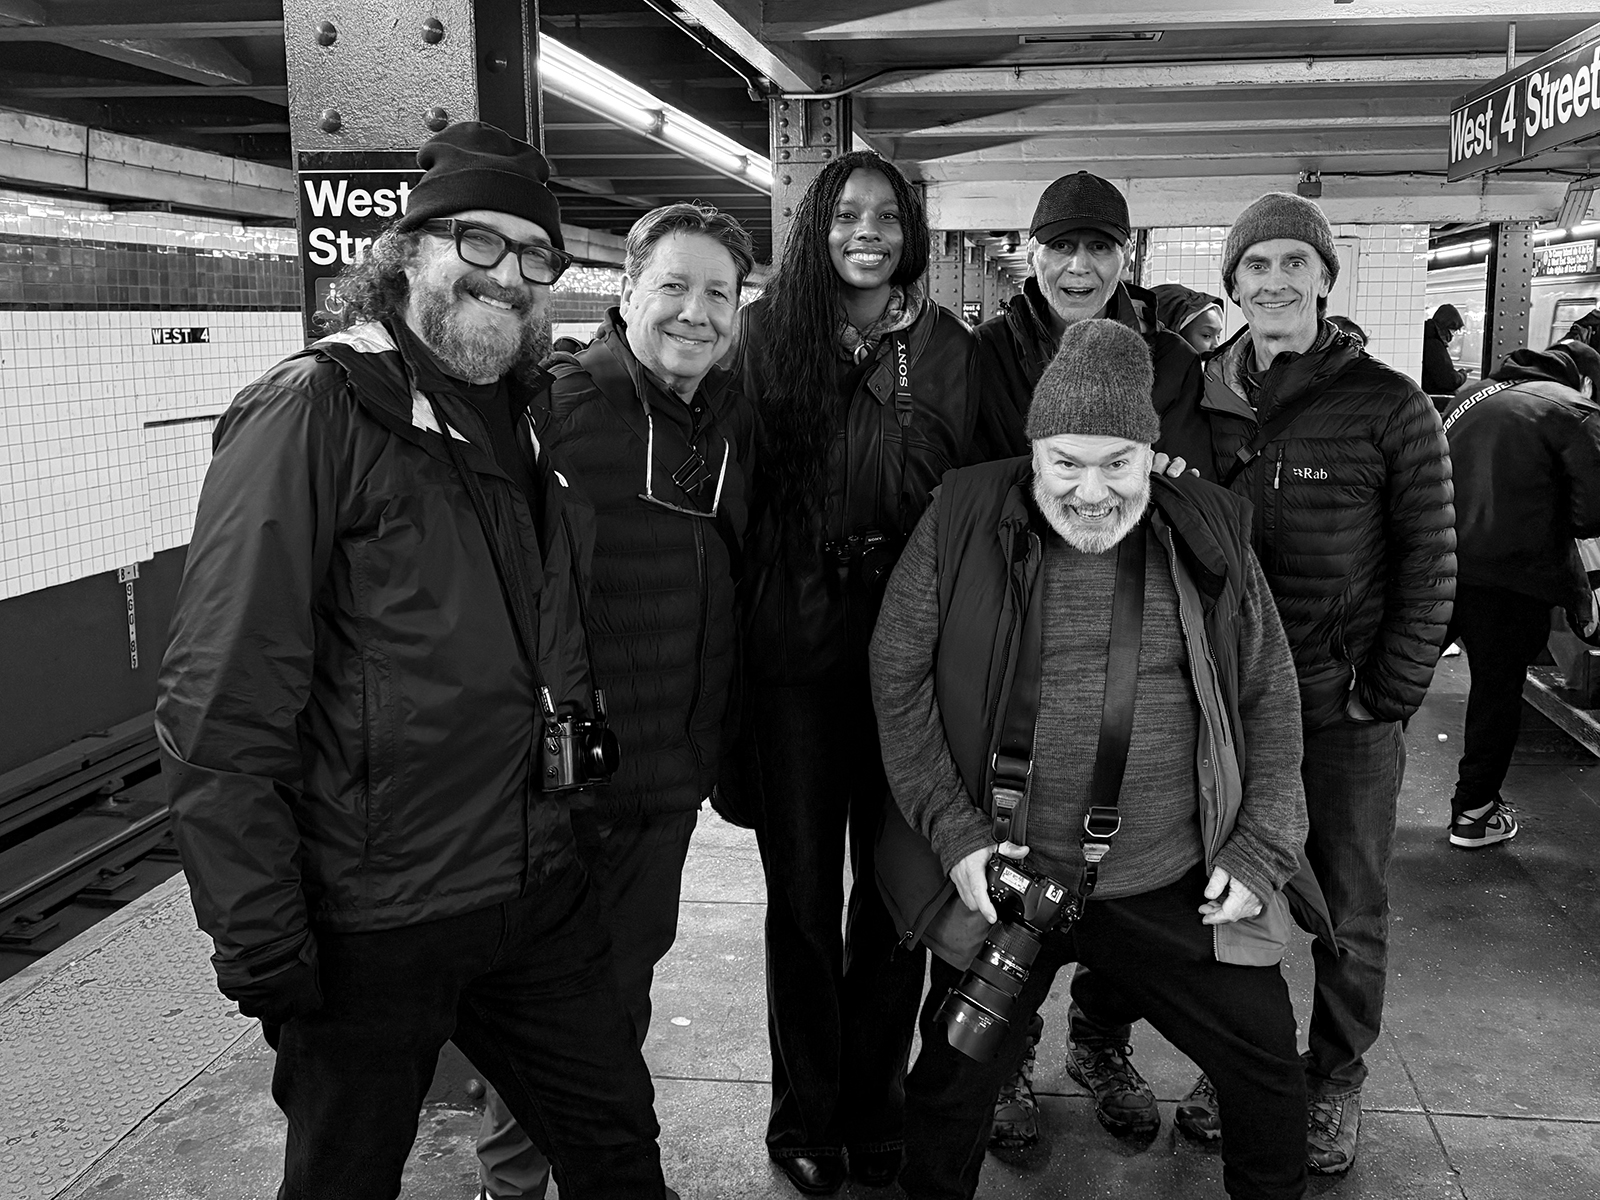
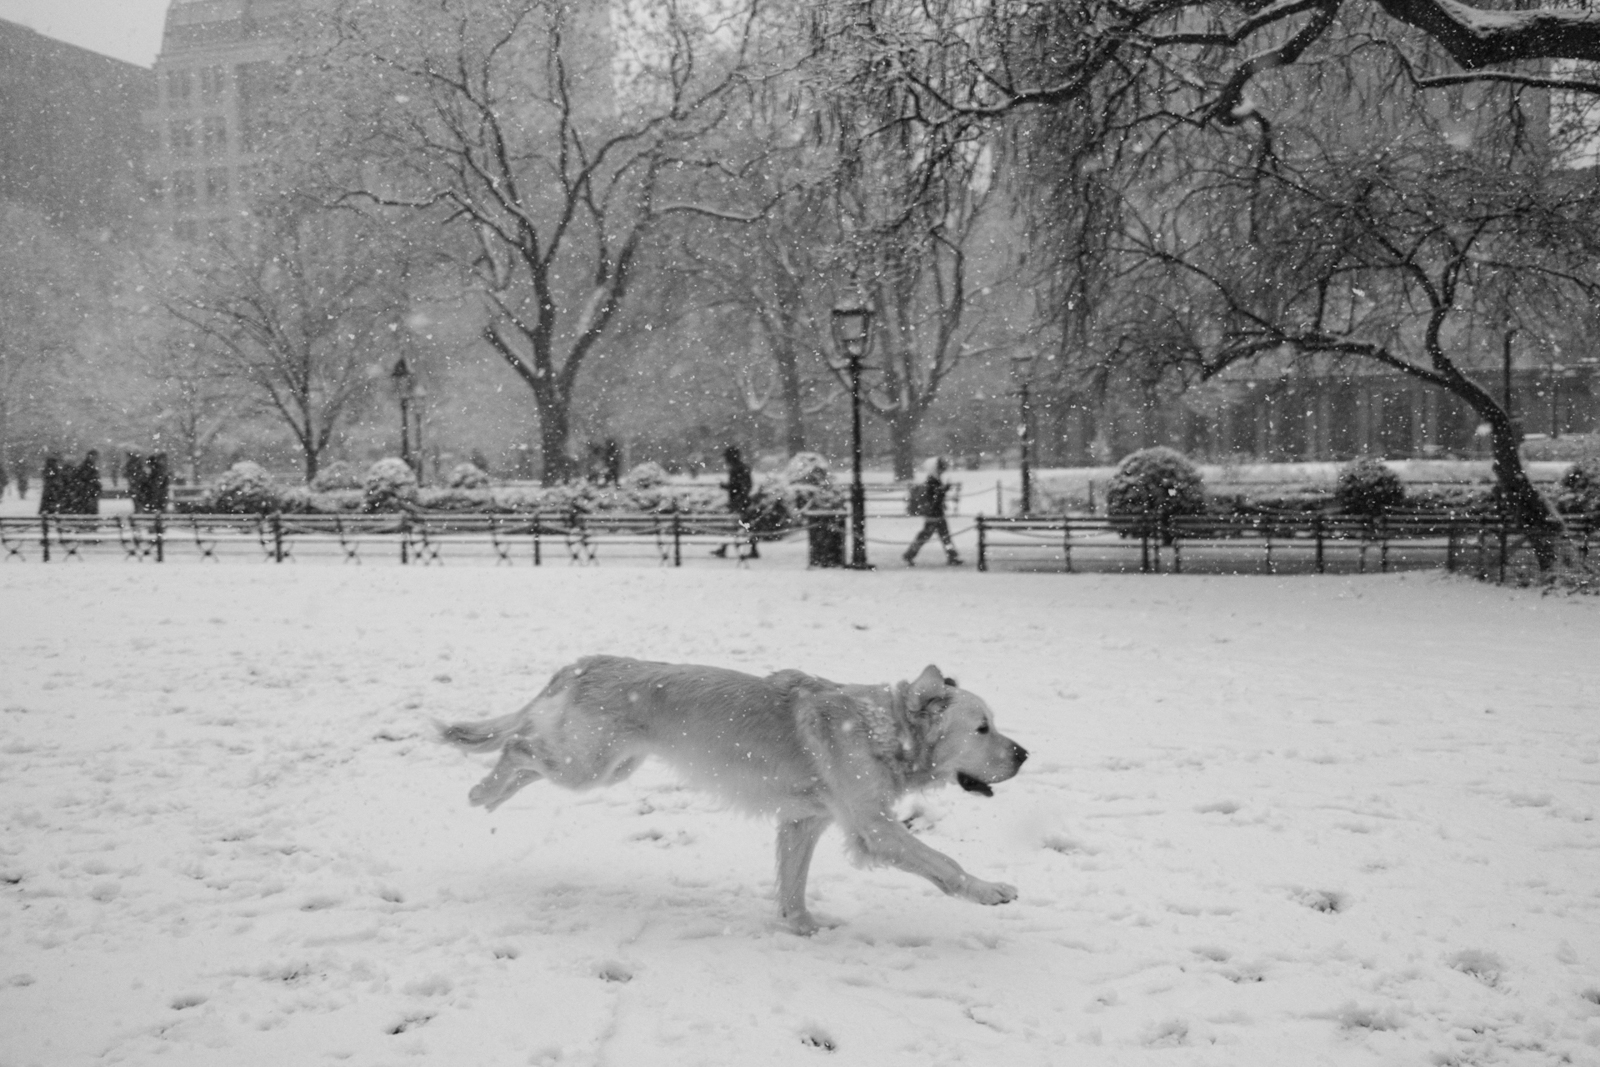
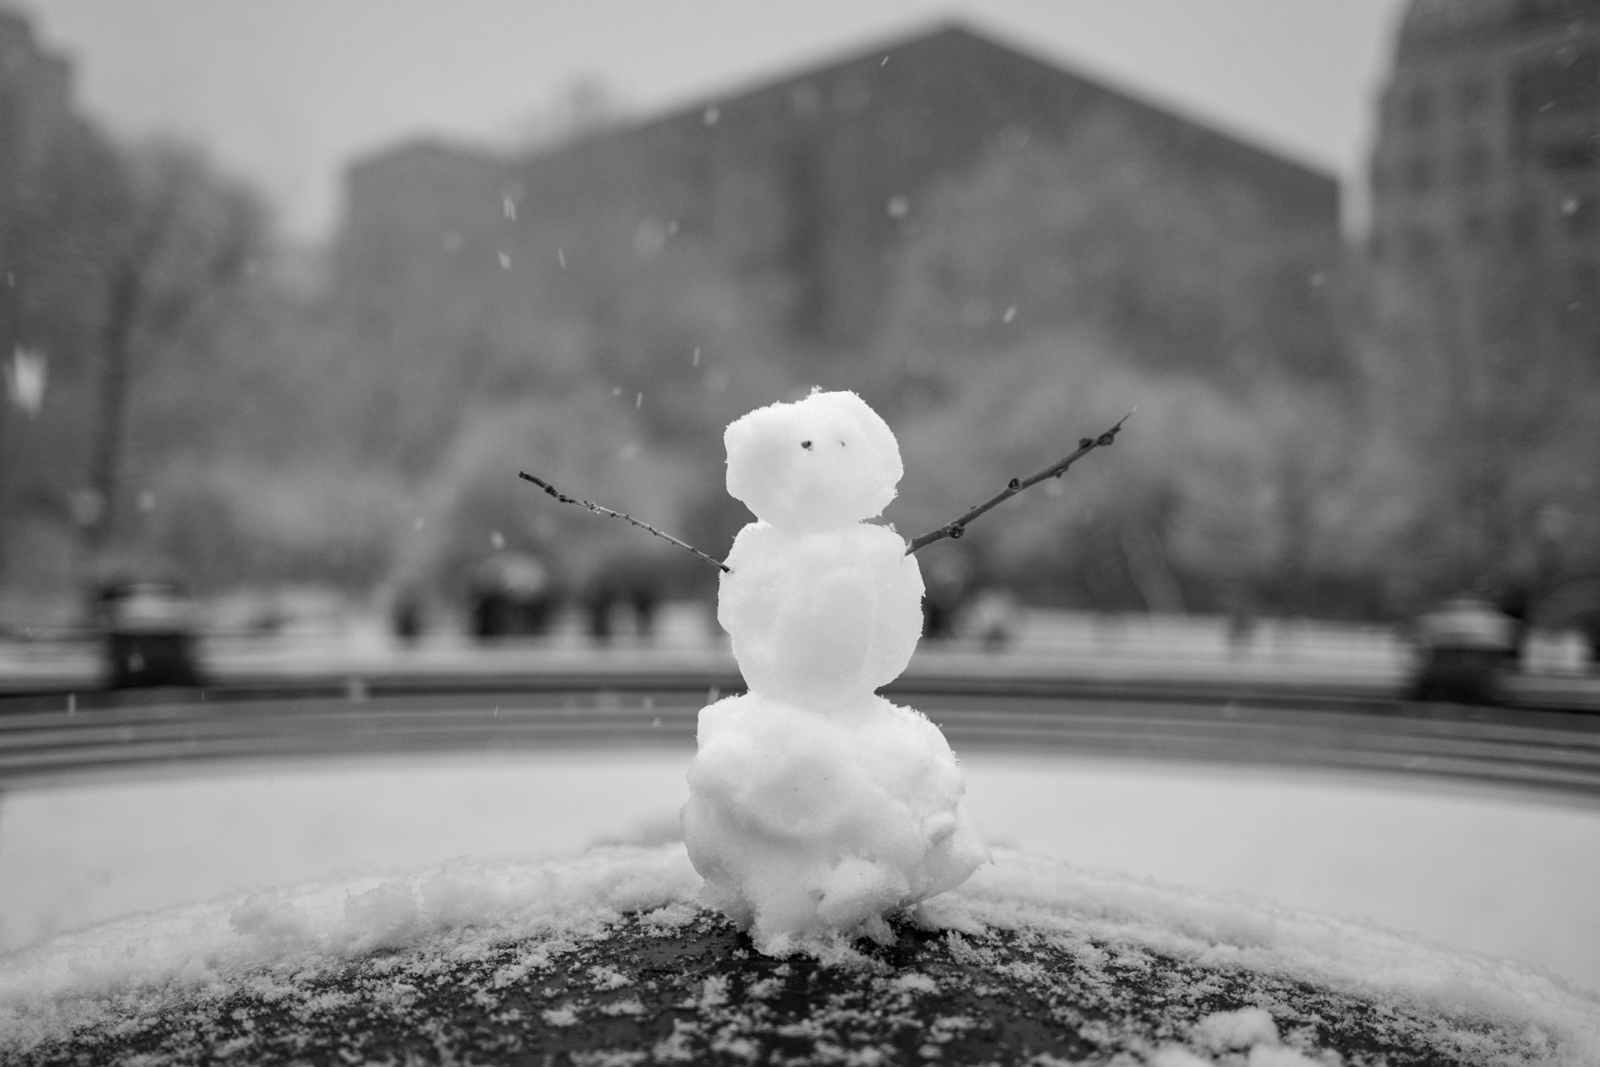
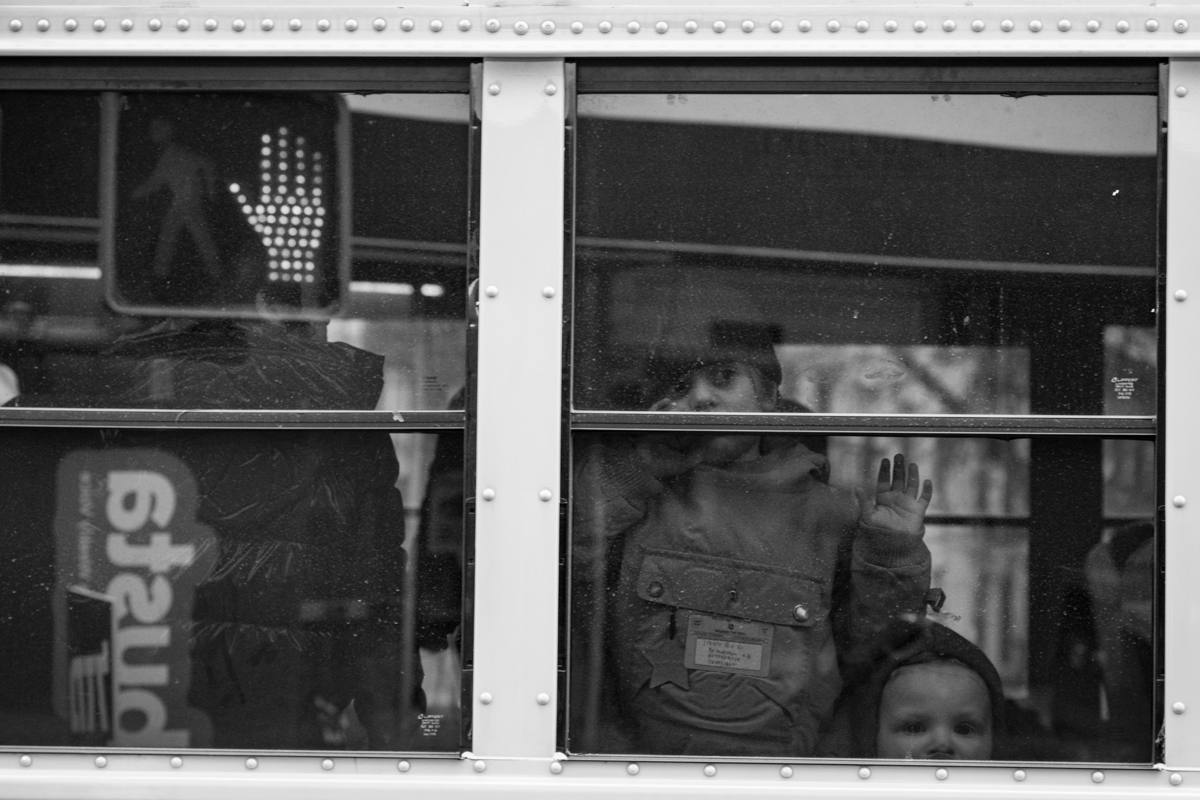
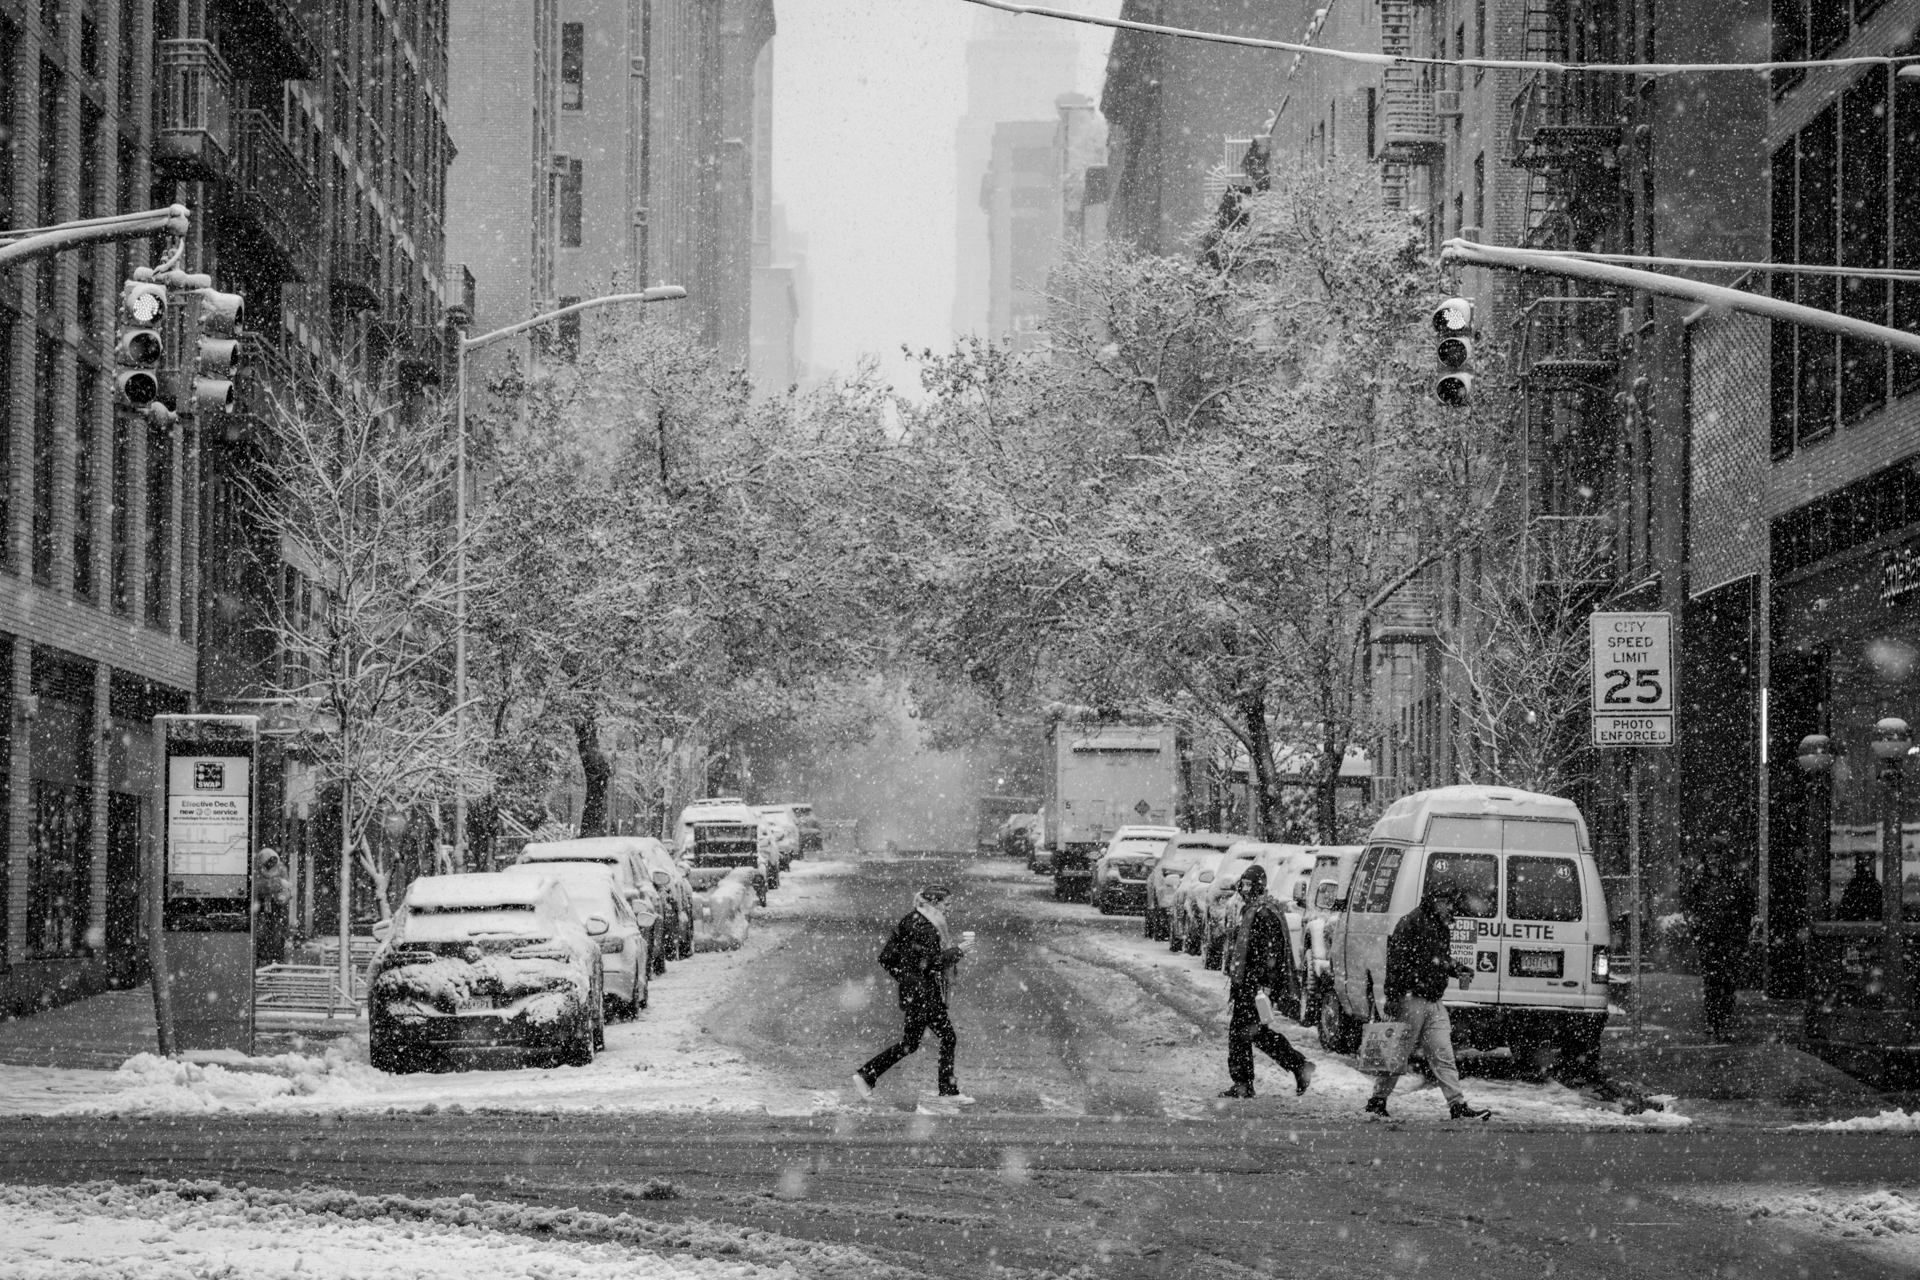
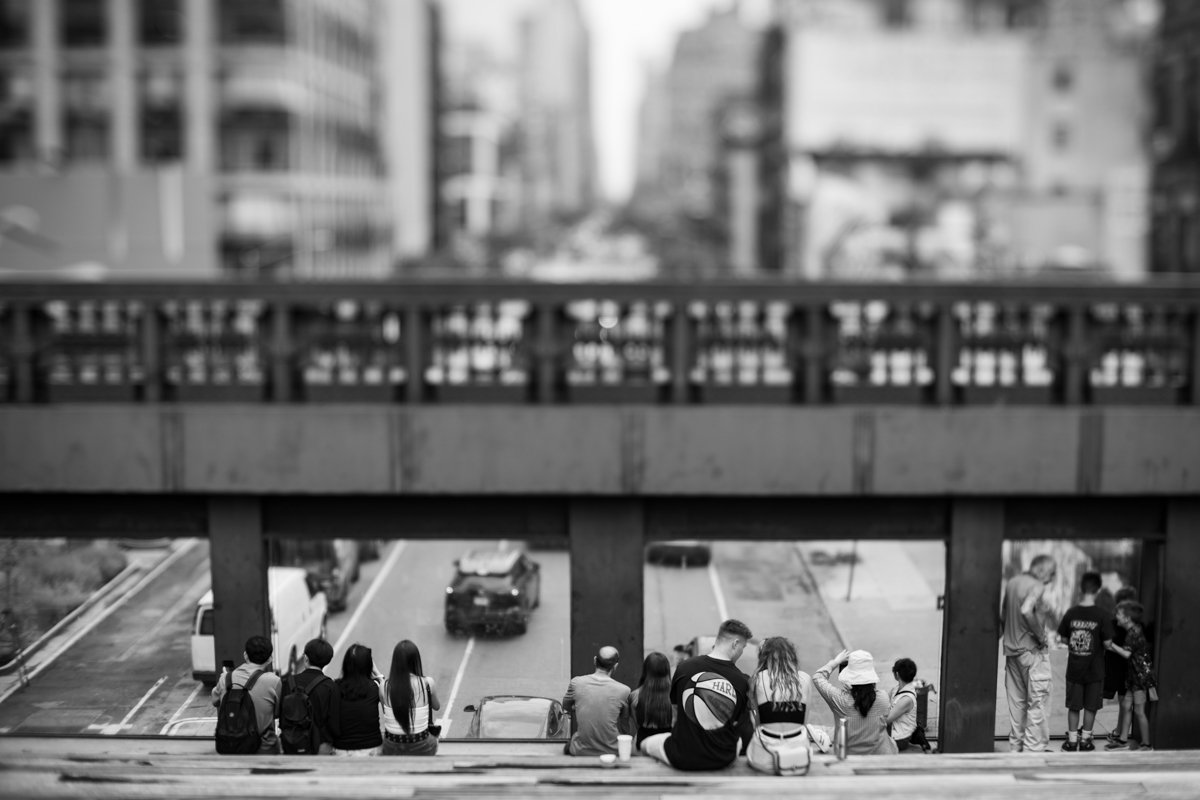
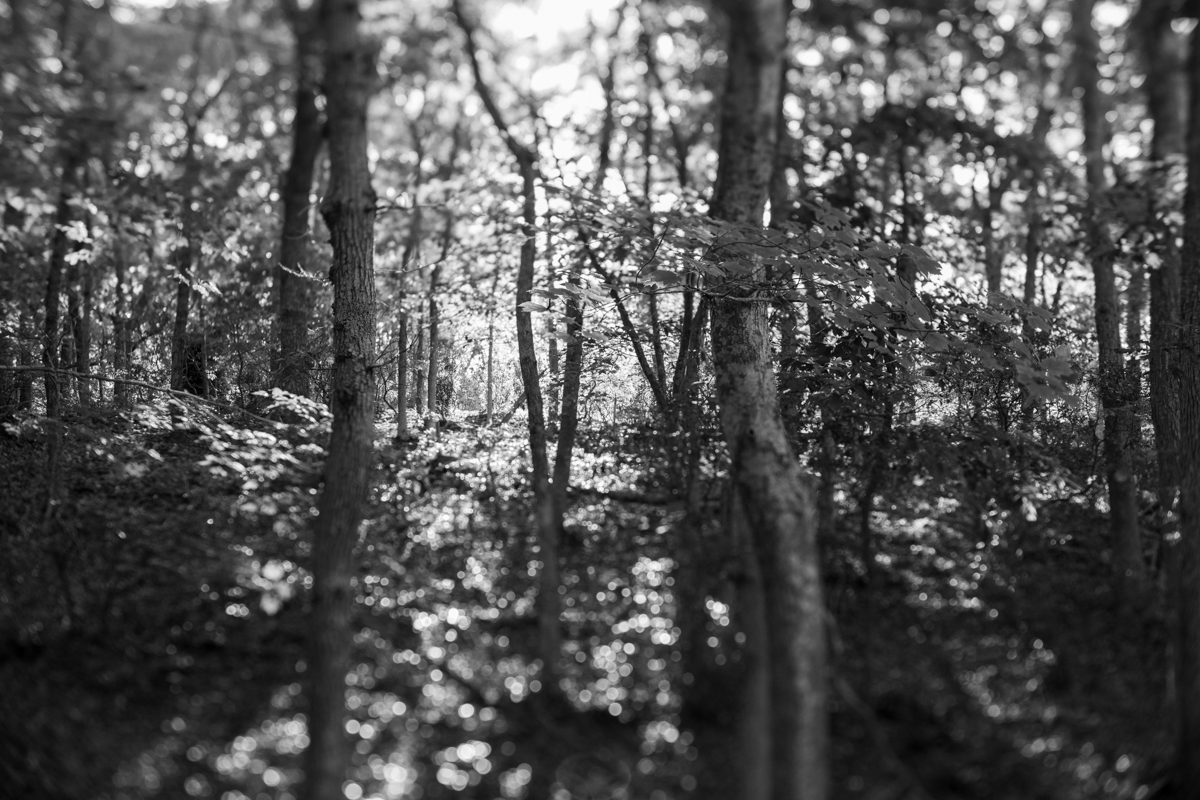
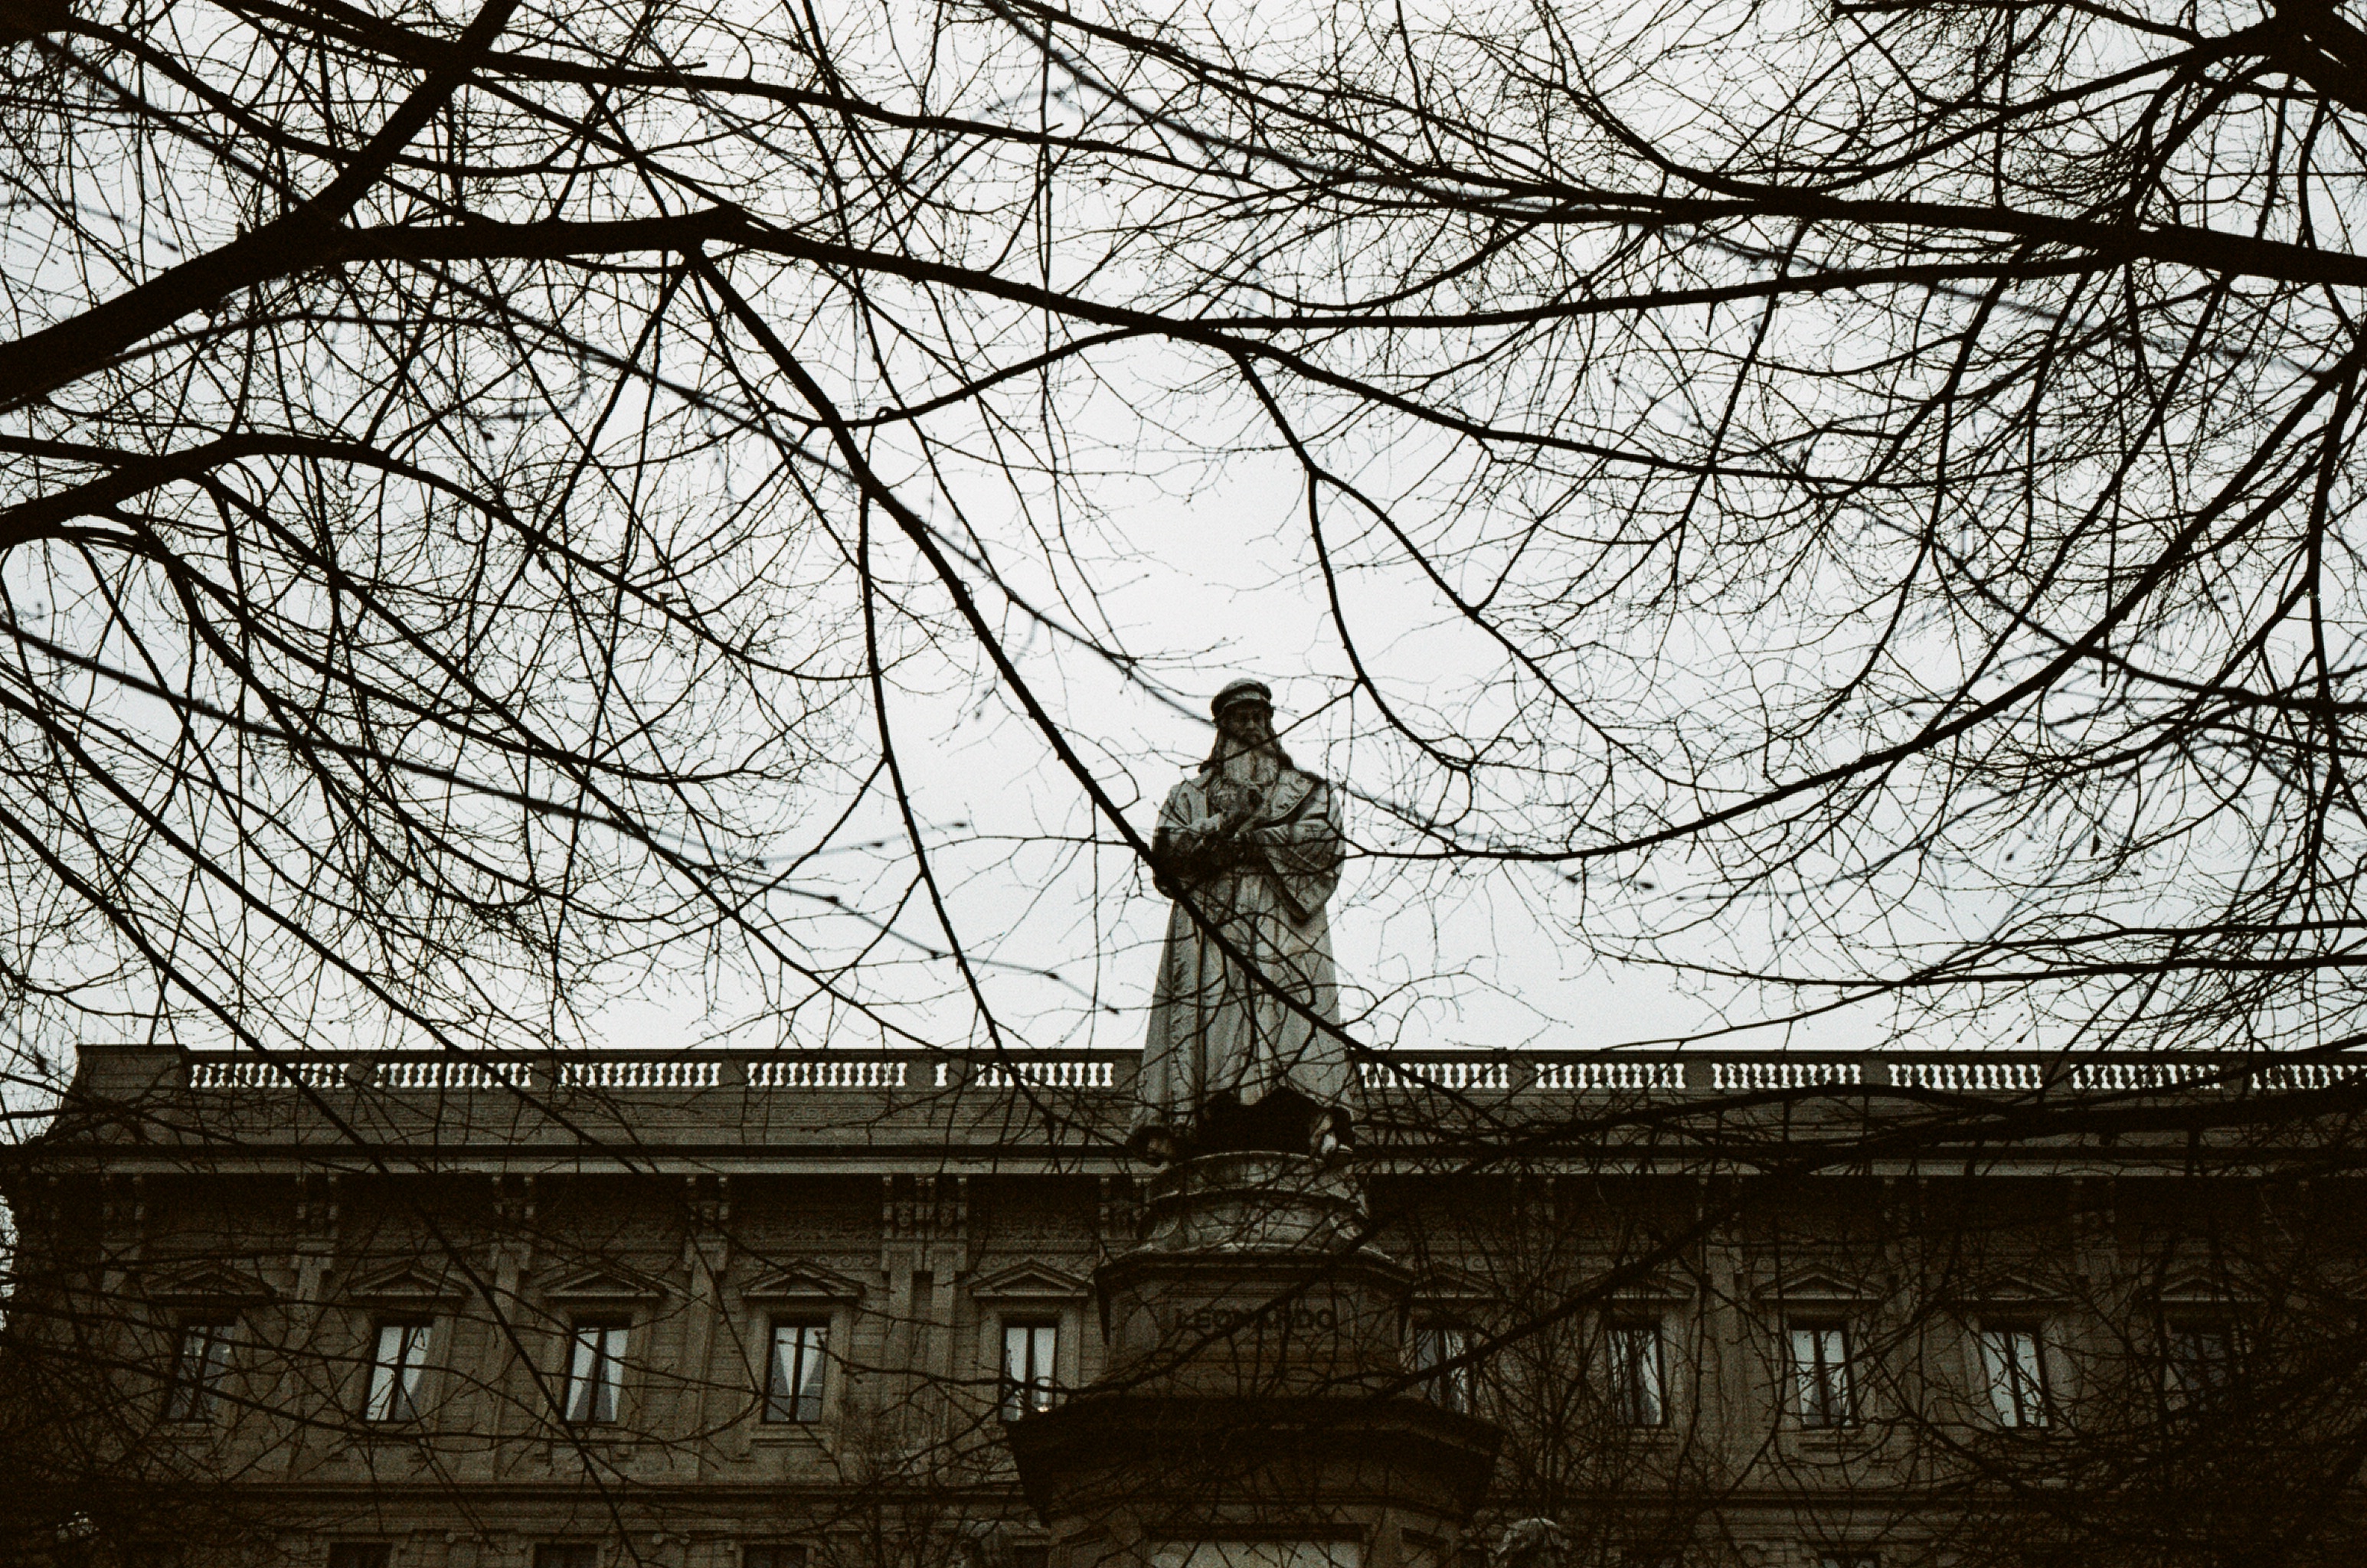
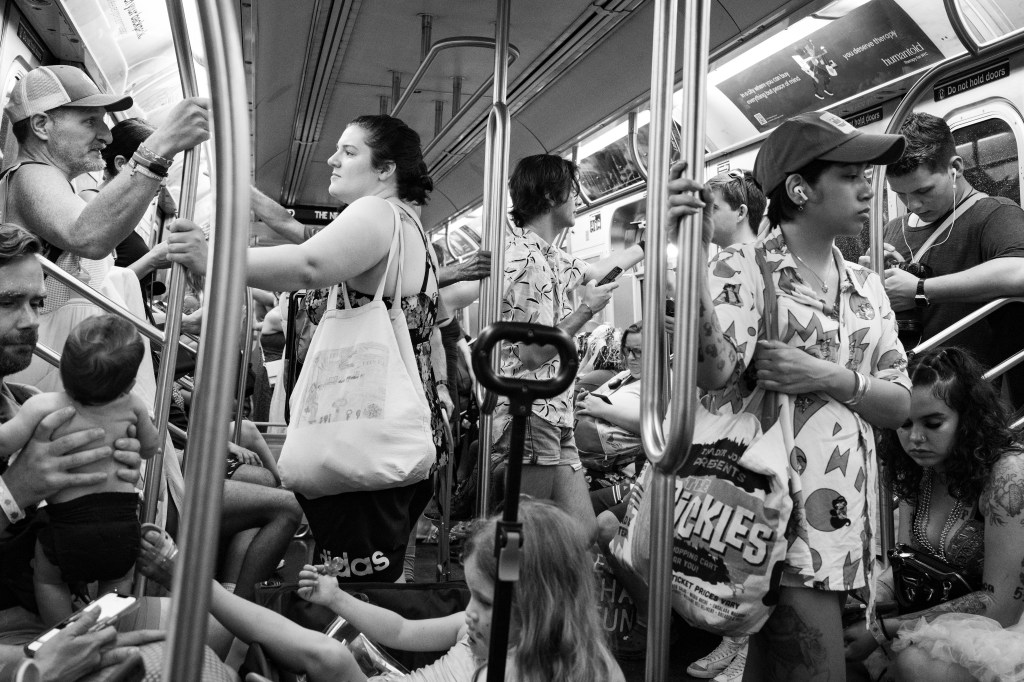
There is a specific kind of silence that falls over New York City when the snow starts to come down. As a street photographer, you spend your life looking for those rare moments where the light, the subject, and the environment align perfectly. This past weekend (January 16–18), during our Passionate Street Photographer Winter Workshop, the city gave us exactly that.
Co-teaching alongside Steve Simon is always a masterclass in itself, but this year was truly unique. We were met with cold, biting wintry conditions, but the reward was a beautiful, magical snowfall that transformed the grit of the Manhattan streets into a cinematic dreamscape.
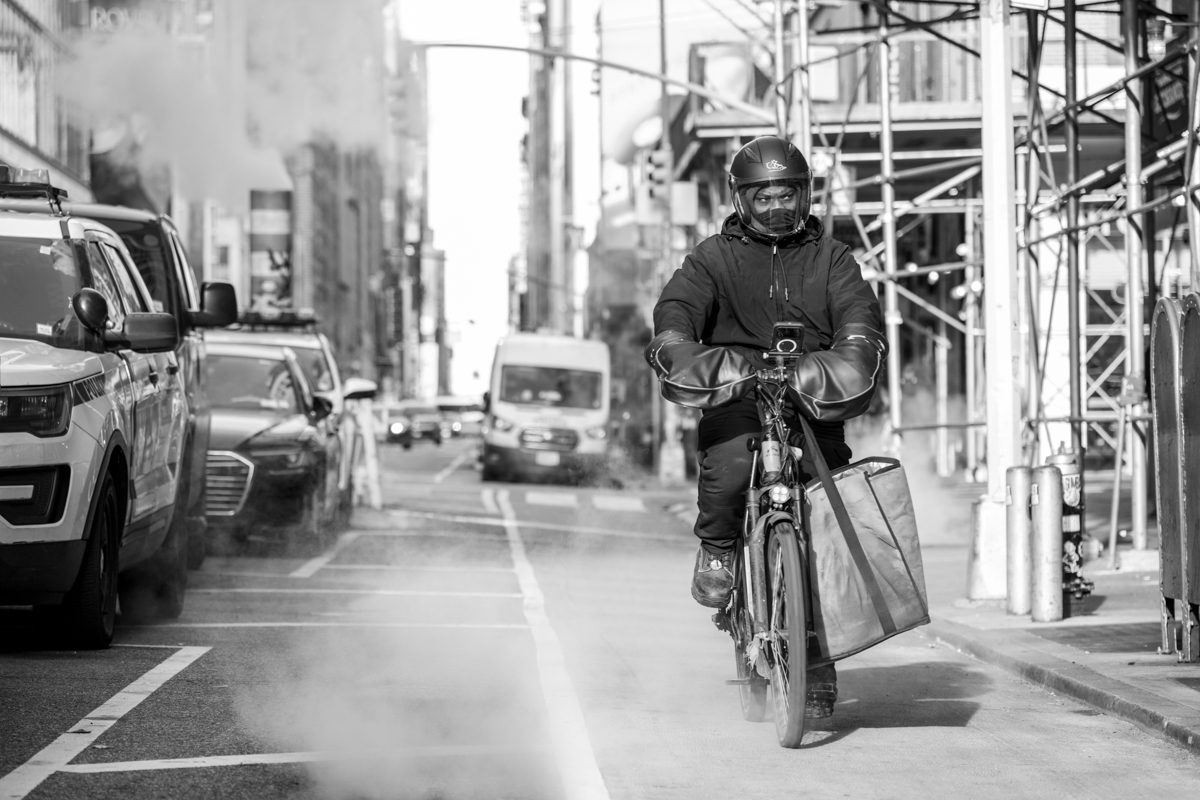
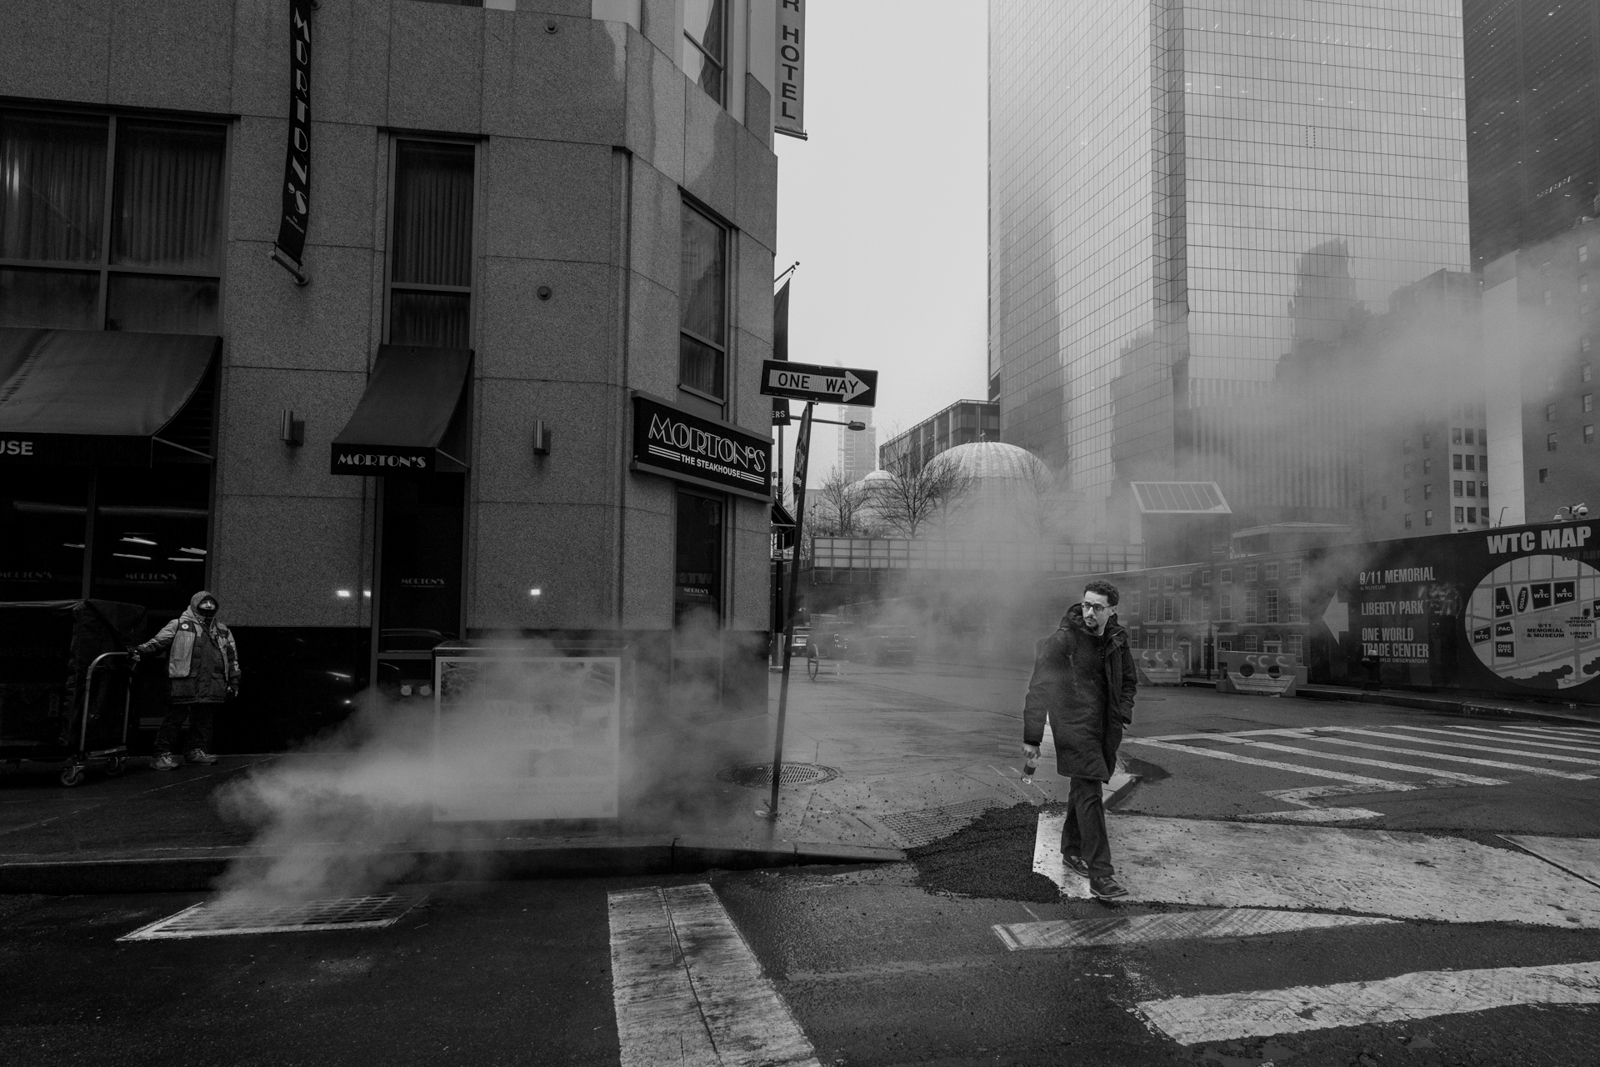
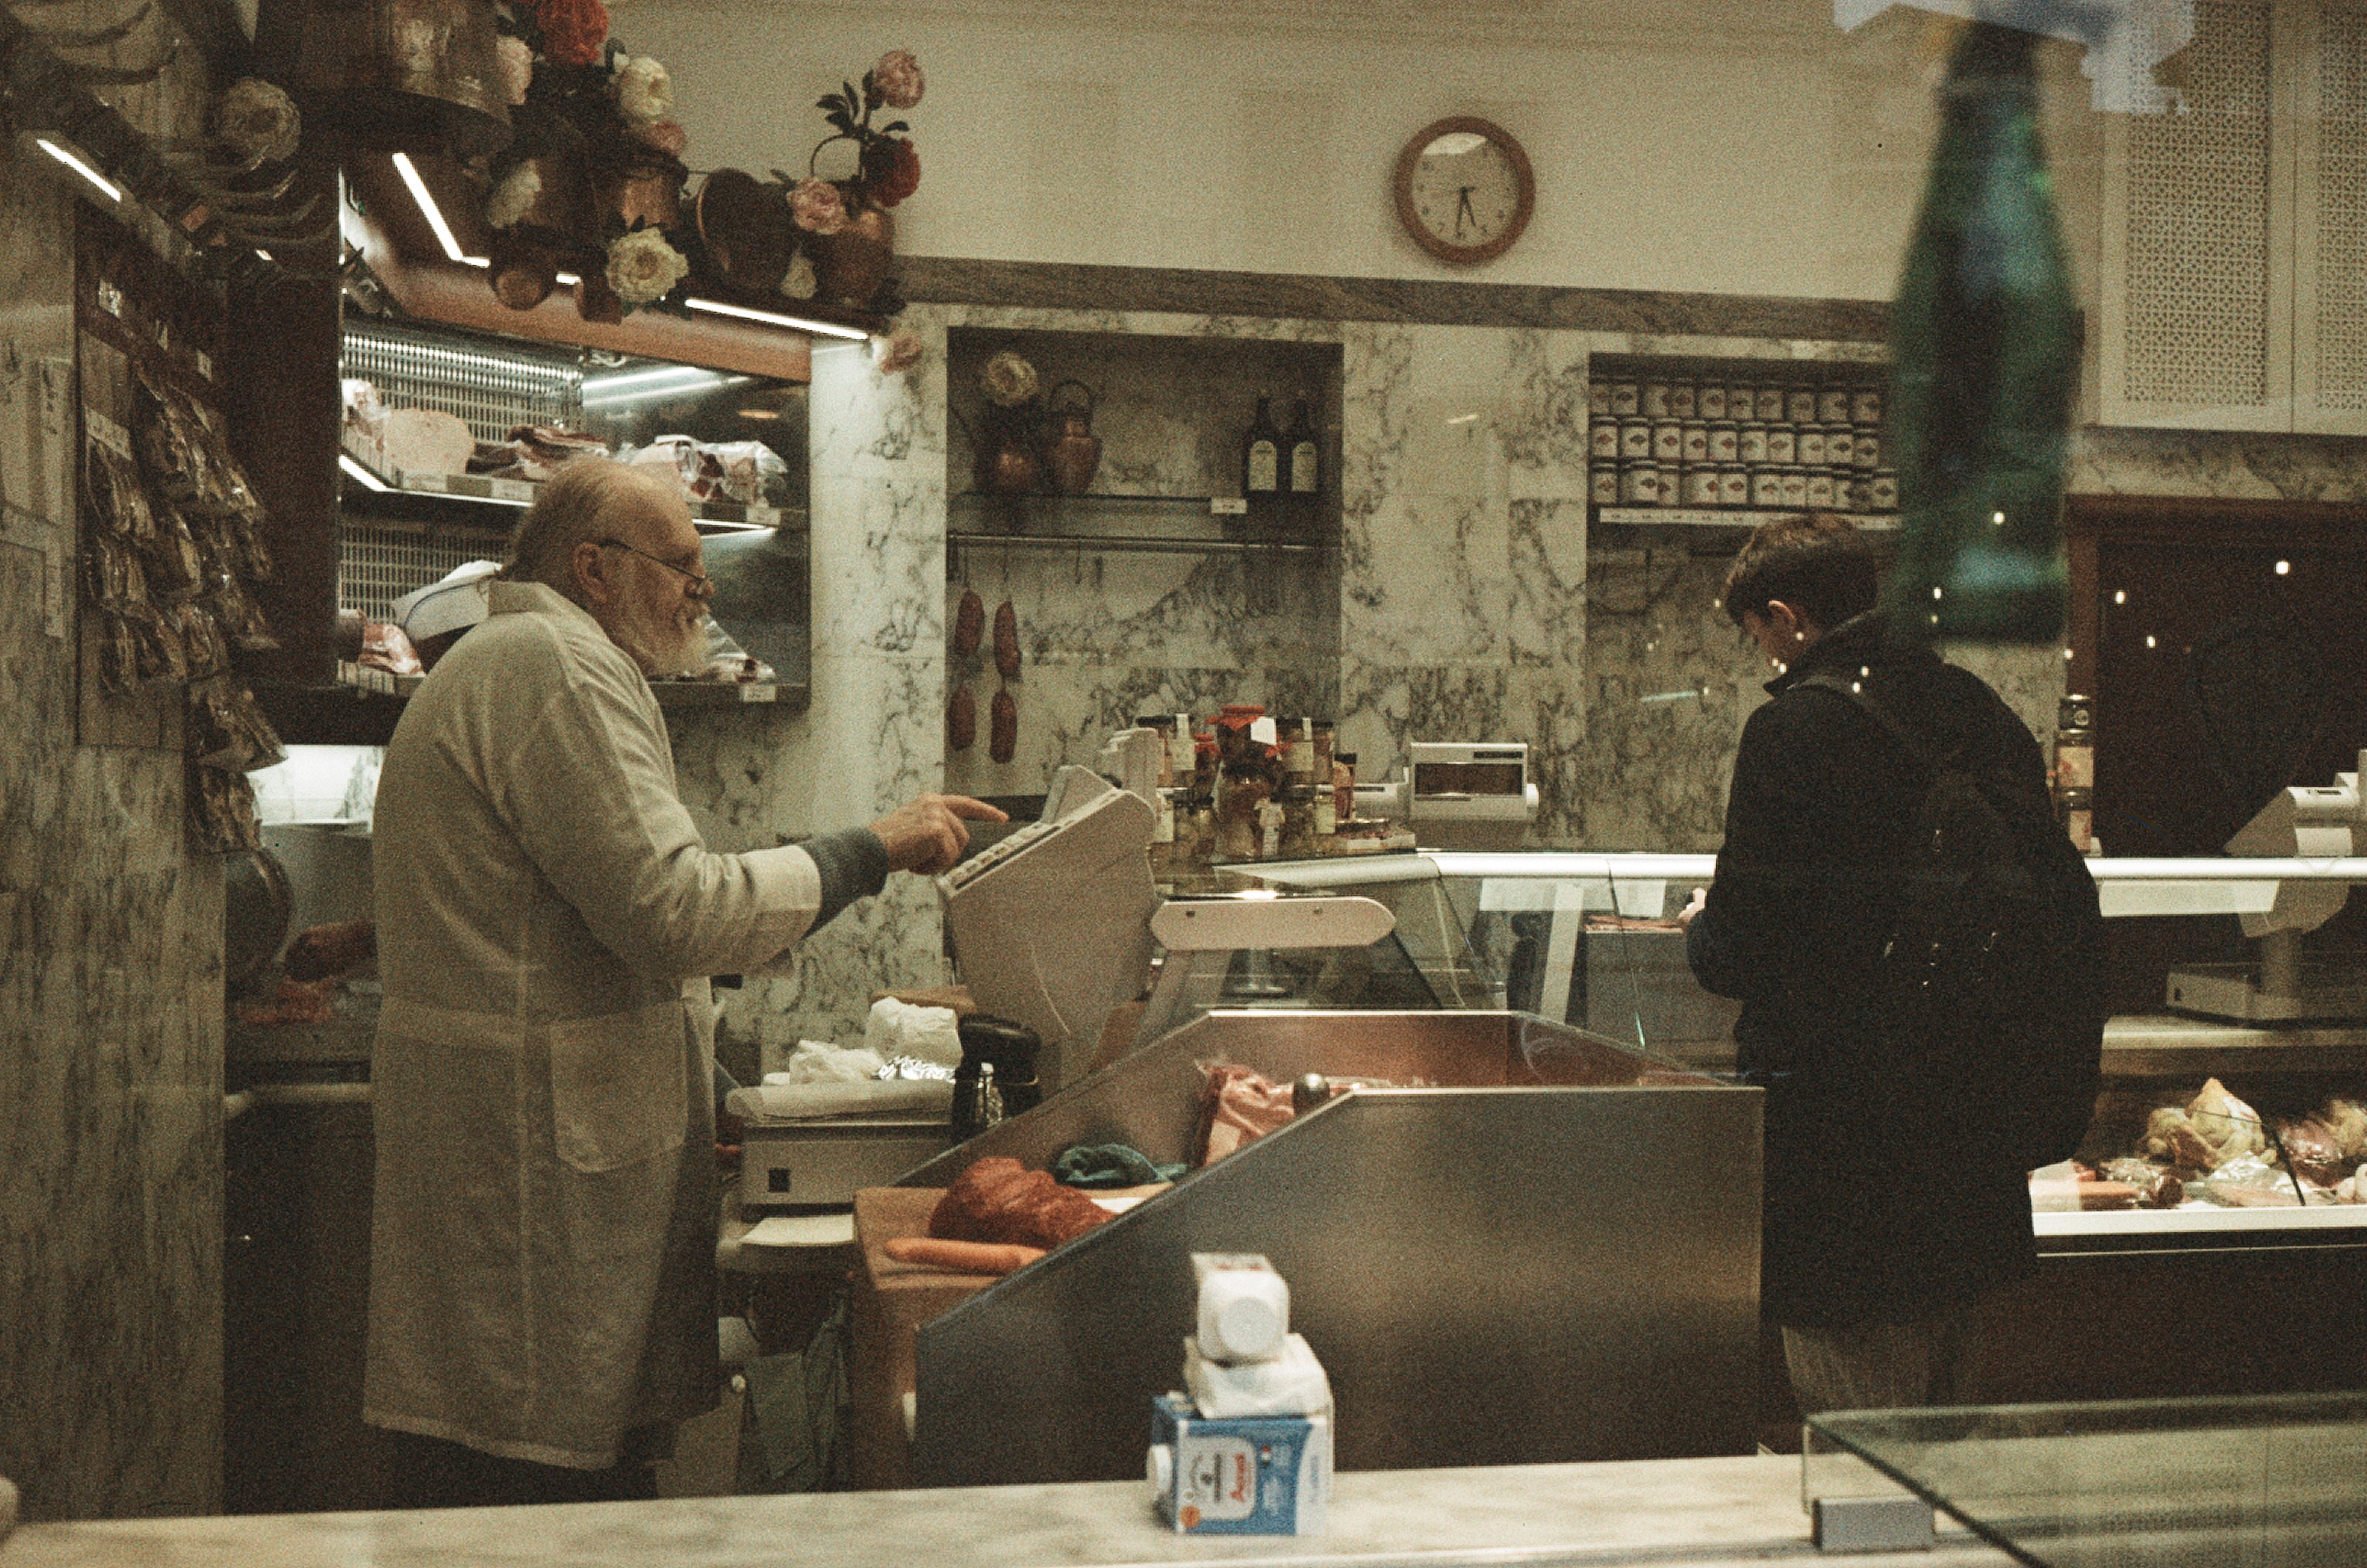
Chasing the Steam One of the highlights of this workshop was what I call “chasing the steam.” It’s a bit of NYC lore that many visitors miss: Manhattan is the only city in the world with such a massive district steam system running beneath the streets, allowing buildings to hook up directly for heating.
For a photographer, those iconic white plumes rising from the asphalt are pure gold. They provide layers, texture, and a sense of mystery that is quintessentially “New York.” We spent time teaching the students how to use that steam to back-light subjects and create atmosphere. It was a thrill to see them master the technical challenge of metering for those ephemeral clouds against the dark, wet city streets.
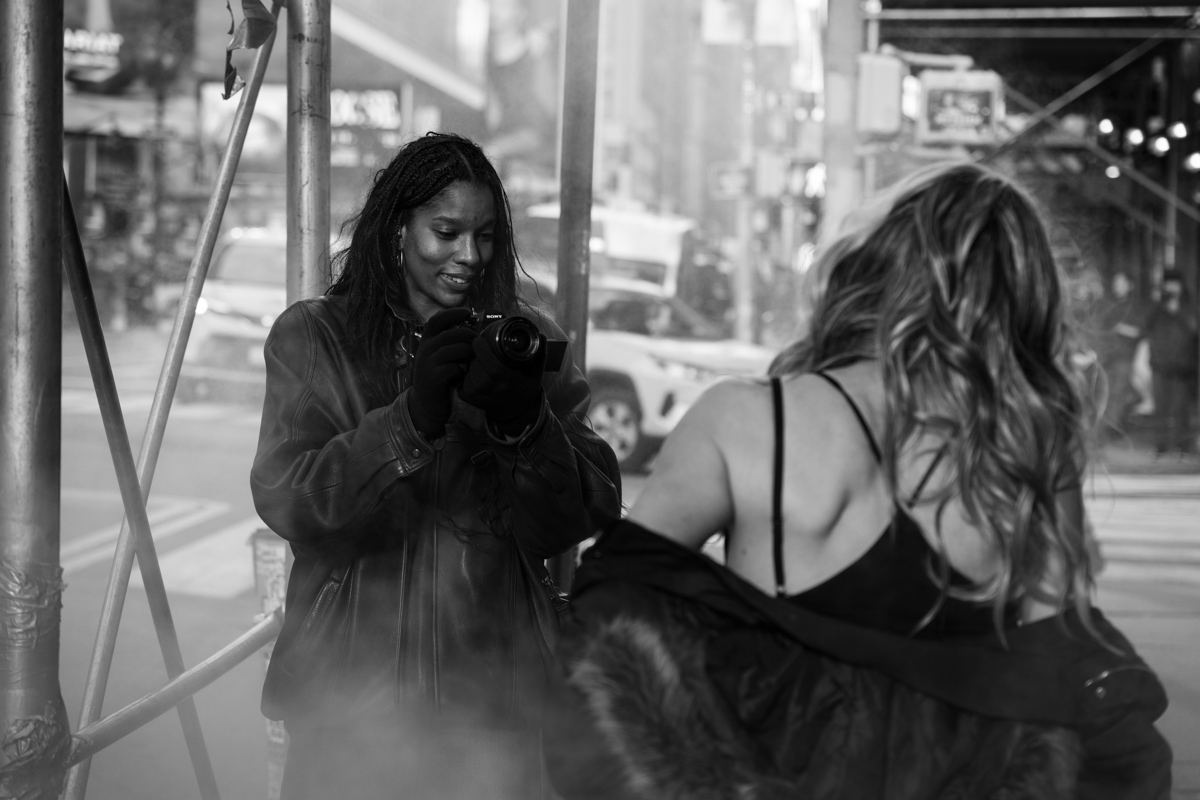
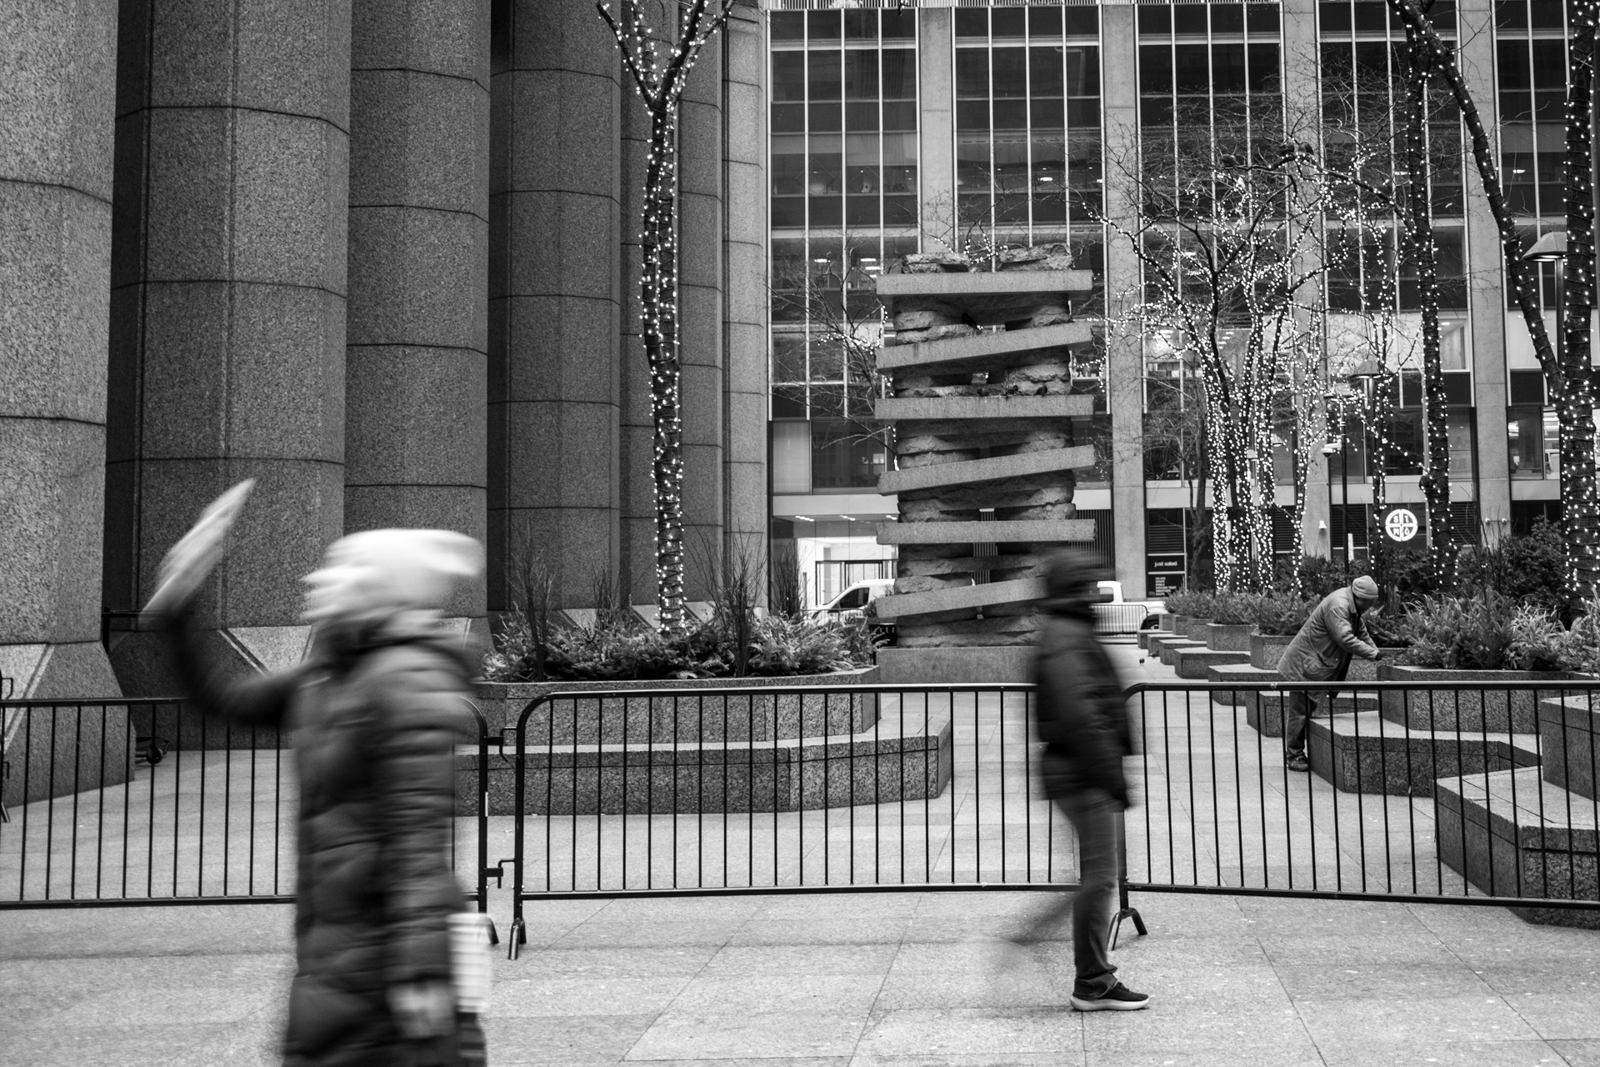
An Intimate Circle of Talent While the weather and the steam were highlights, the real story of the weekend was the group. With a total of four participants, the workshop became an incredibly intimate intensive. I’ve led many workshops, but I have to say, it was a true honor to be surrounded by such talented students. In such a small group, there is nowhere to hide—and these four didn’t want to. They leaned into the cold, pushed their creative boundaries, and showed a level of technical proficiency and “eye” that made our critique sessions some of the most vibrant I’ve ever been a part of.
Three Days of NYC Soul We pushed the group hard, covering a massive amount of ground to ensure they saw every facet of the city’s winter personality:
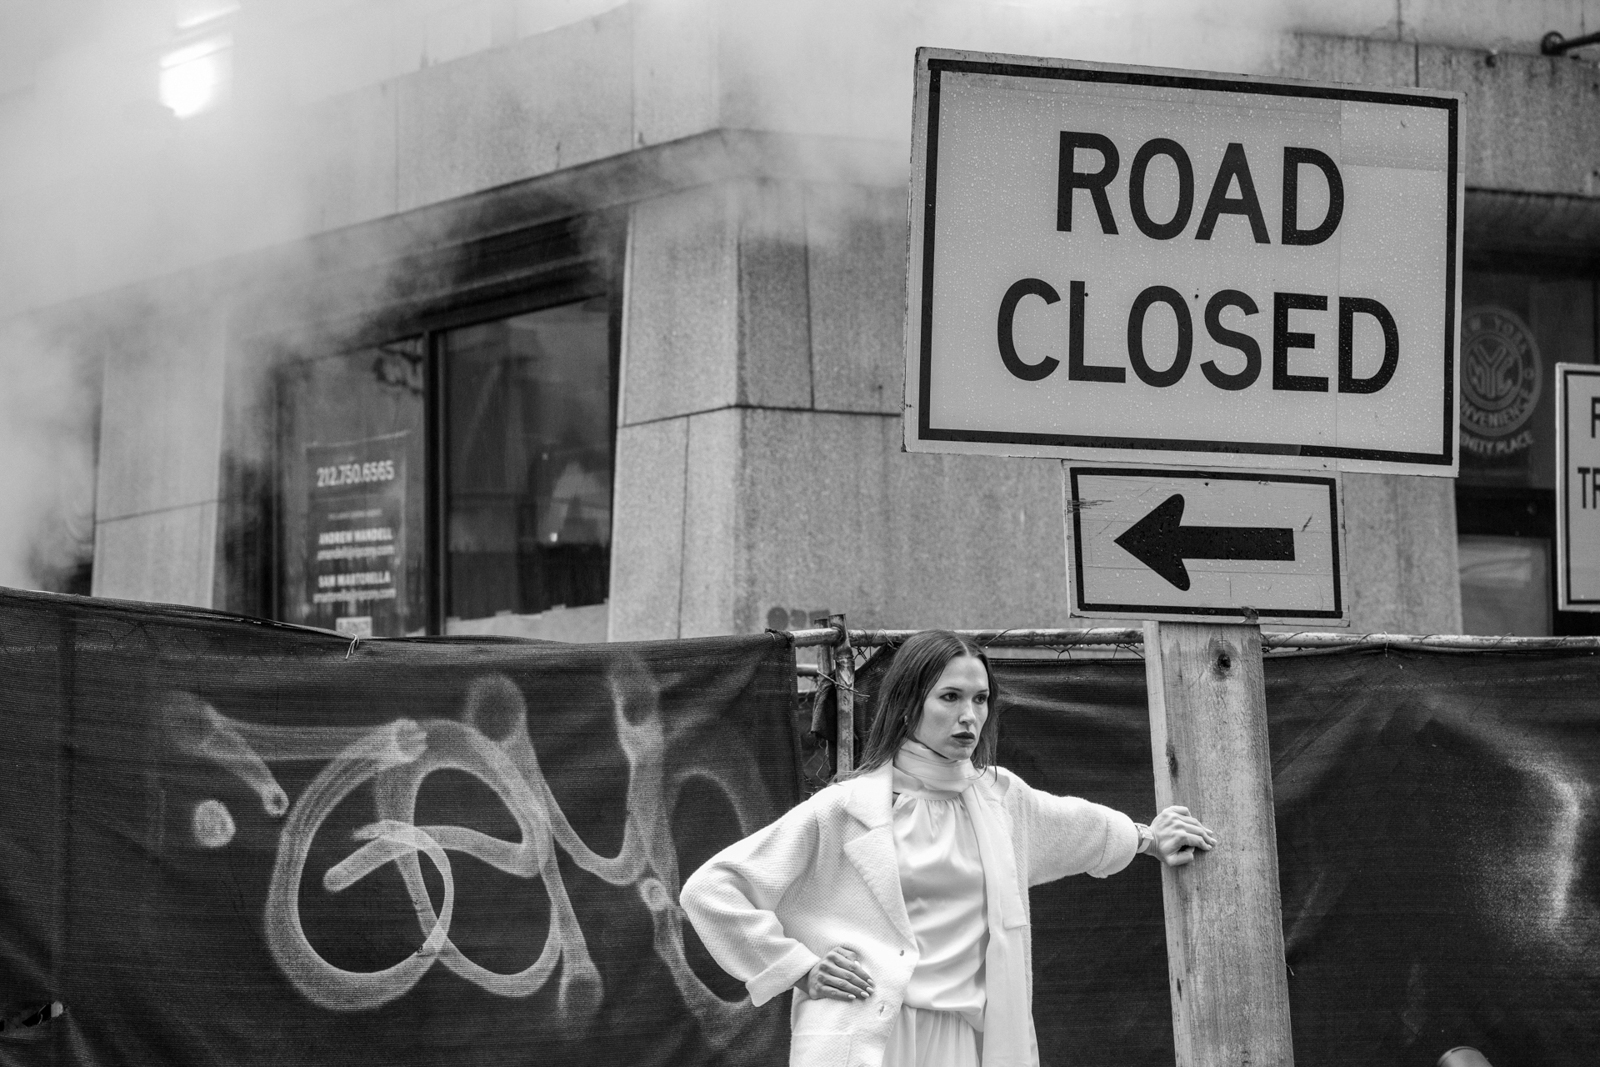
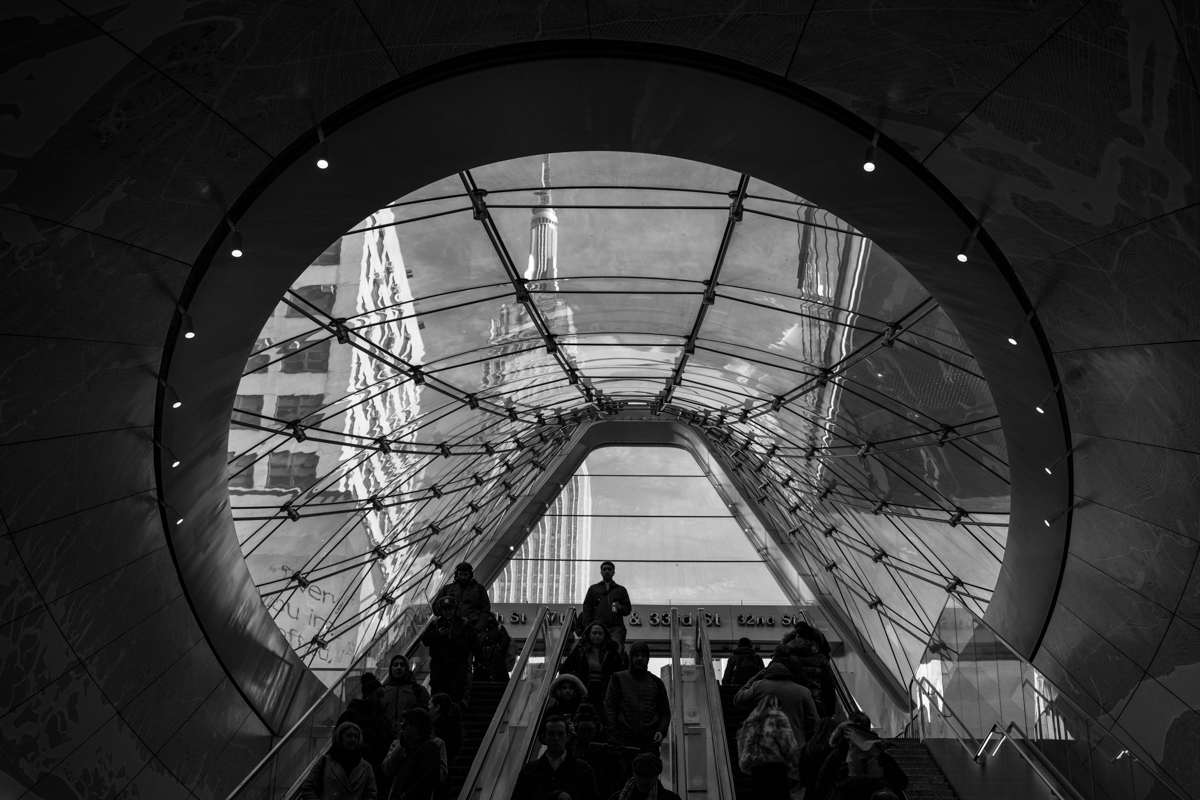
Day 1: The Highs. We kicked things off in Williamsburg before a high-energy shoot at Herald Square. We ended the day at the Edge Observatory and thawed out over a fantastic group dinner at Electric Lemon.
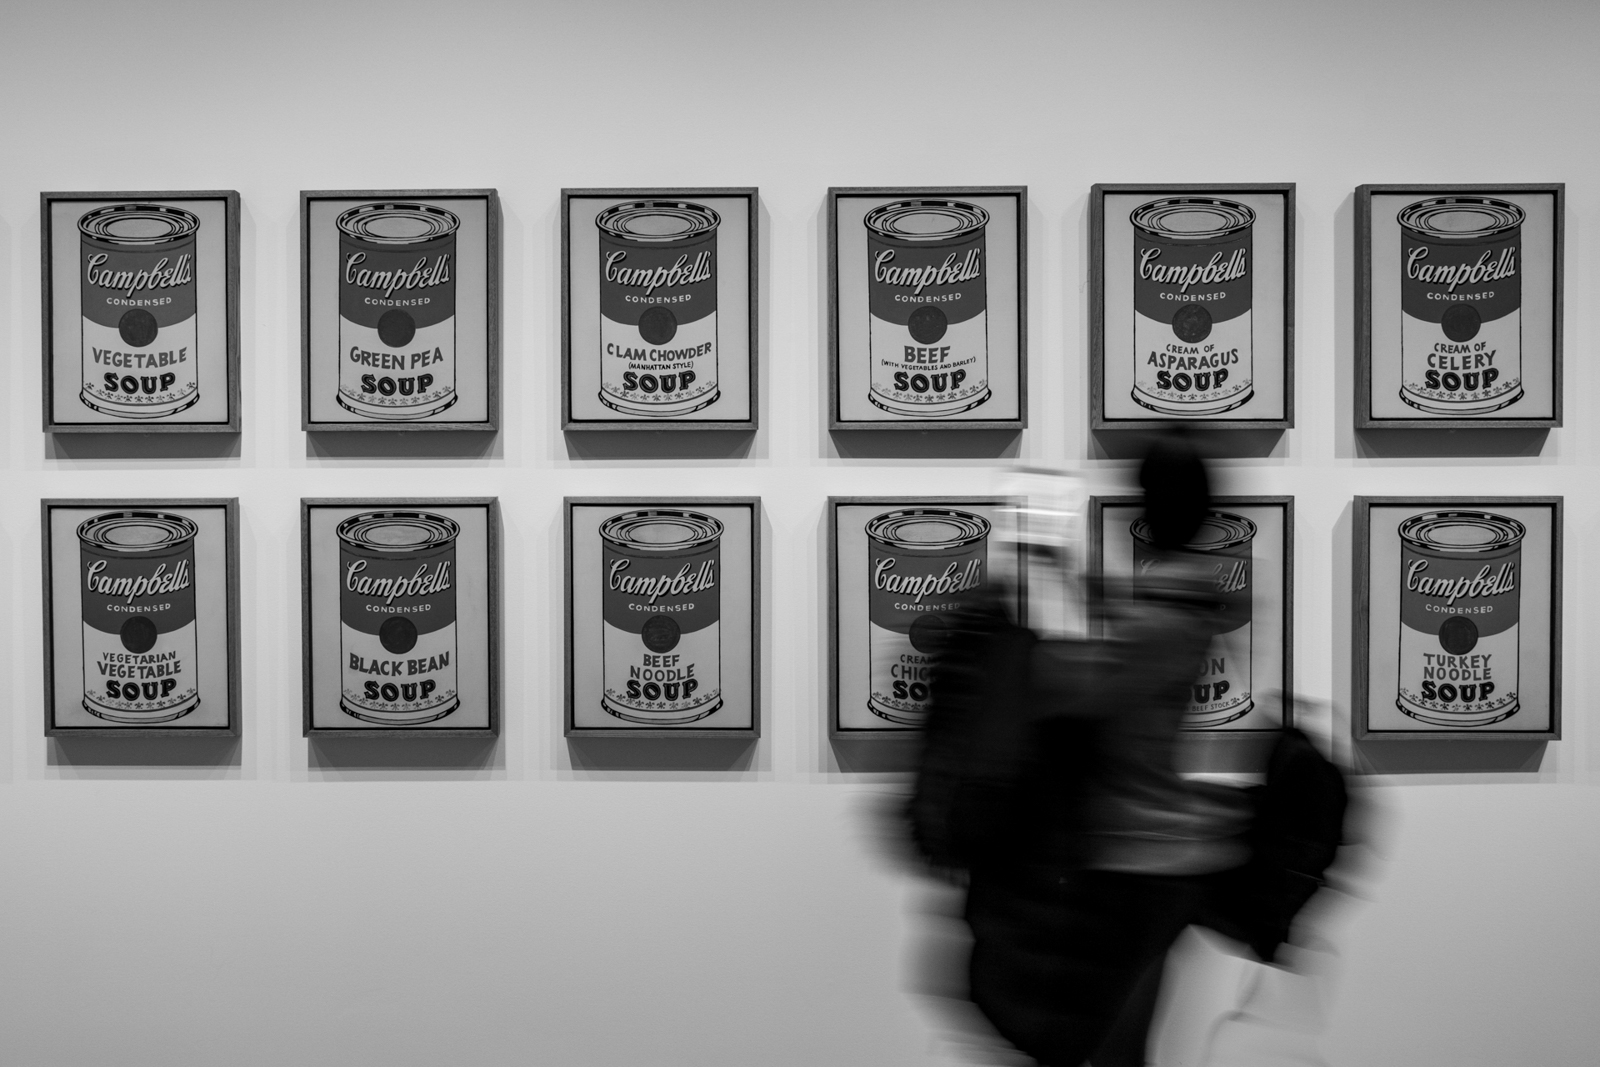
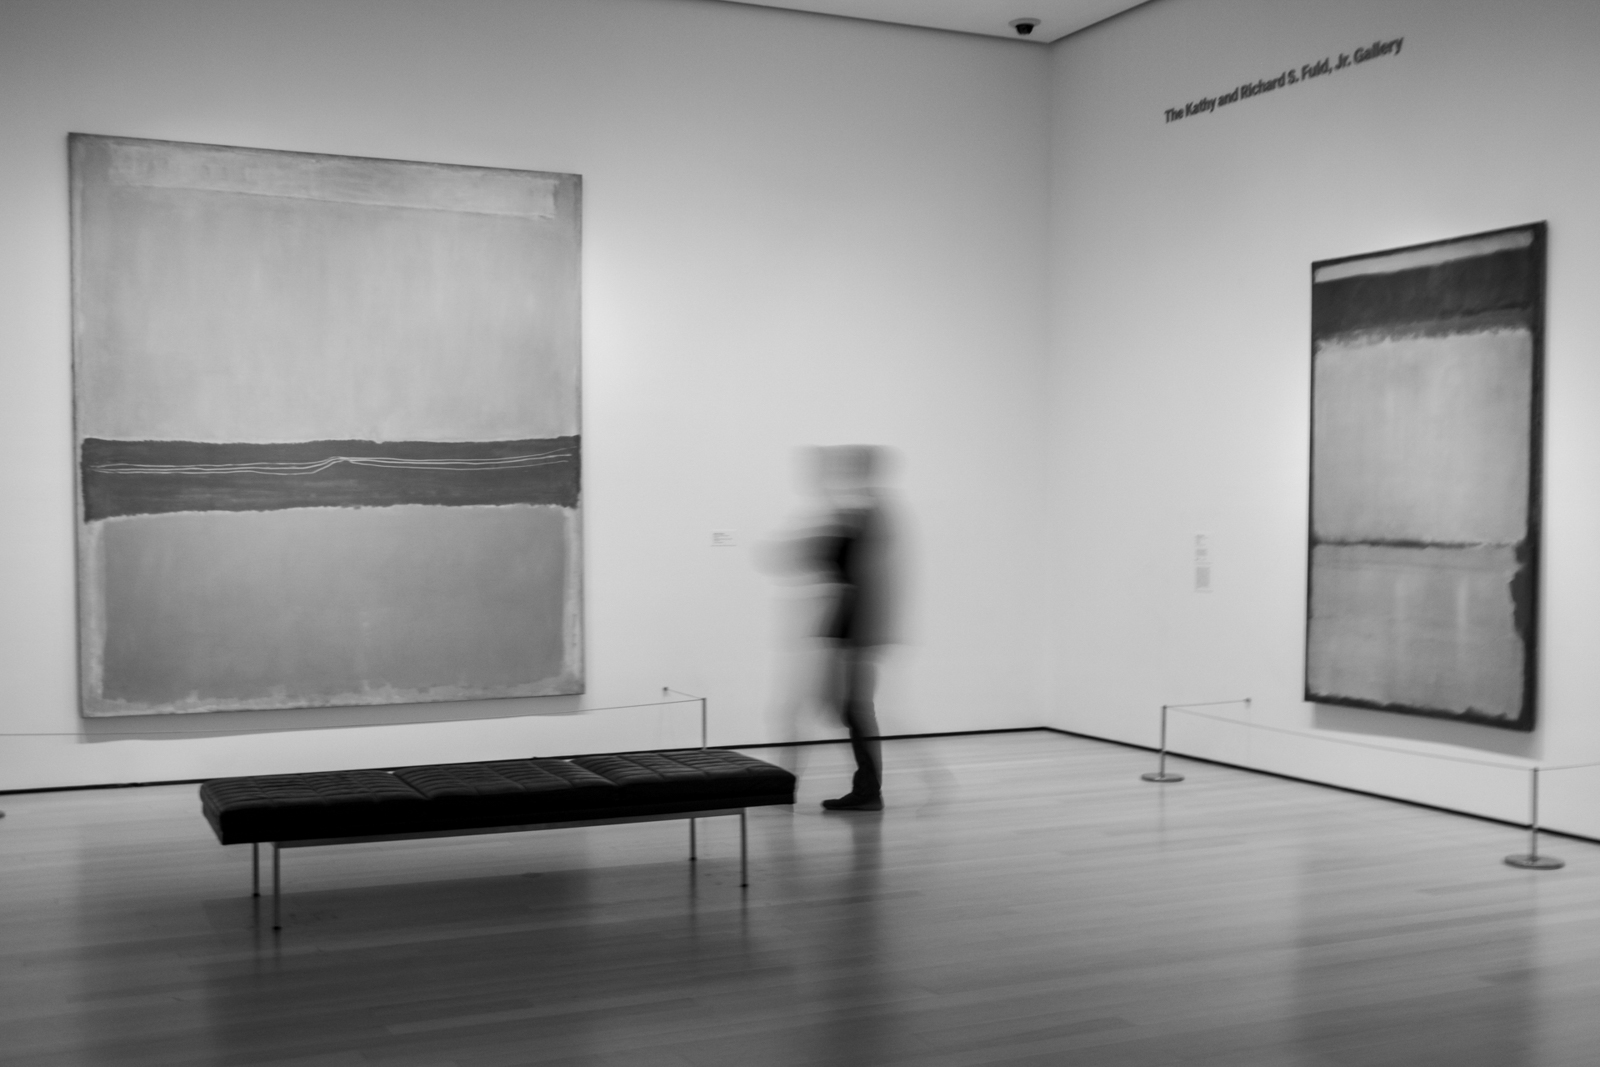
Day 2: The Heart. We moved from the curated art of MoMA to the raw energy of Washington Square Park. The snow began to work its magic as we hit Chinatown, eventually capping the night under the golden light of Grand Central Station.
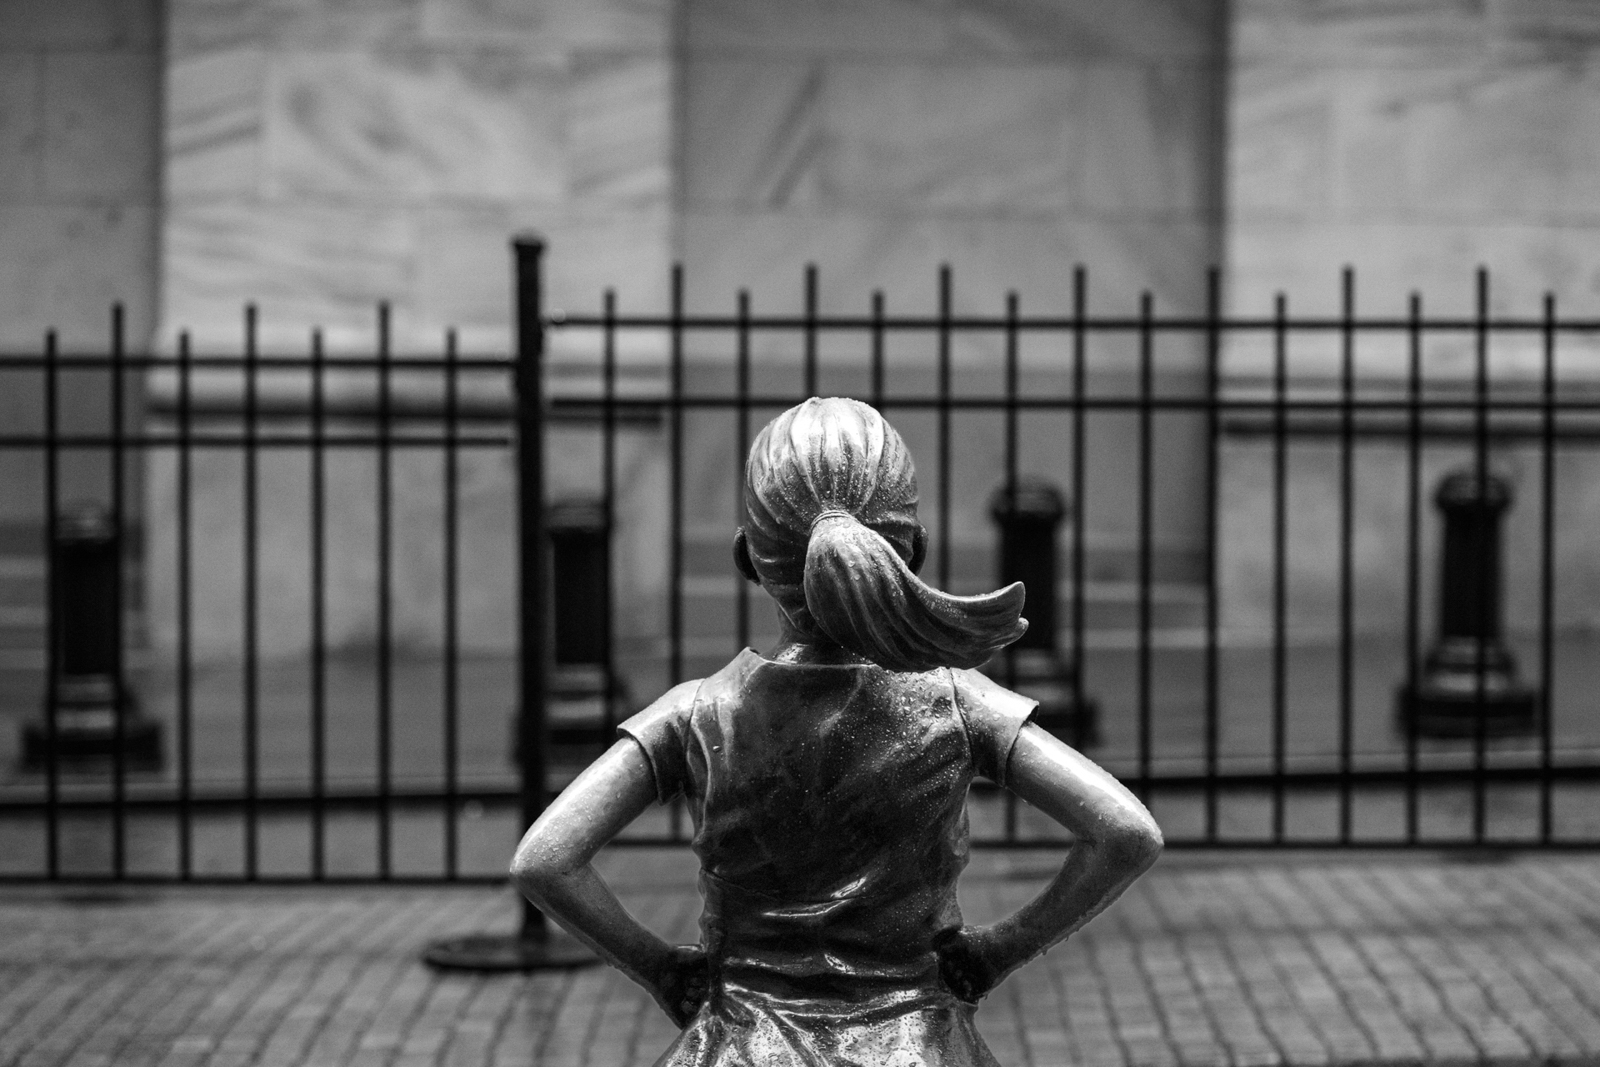
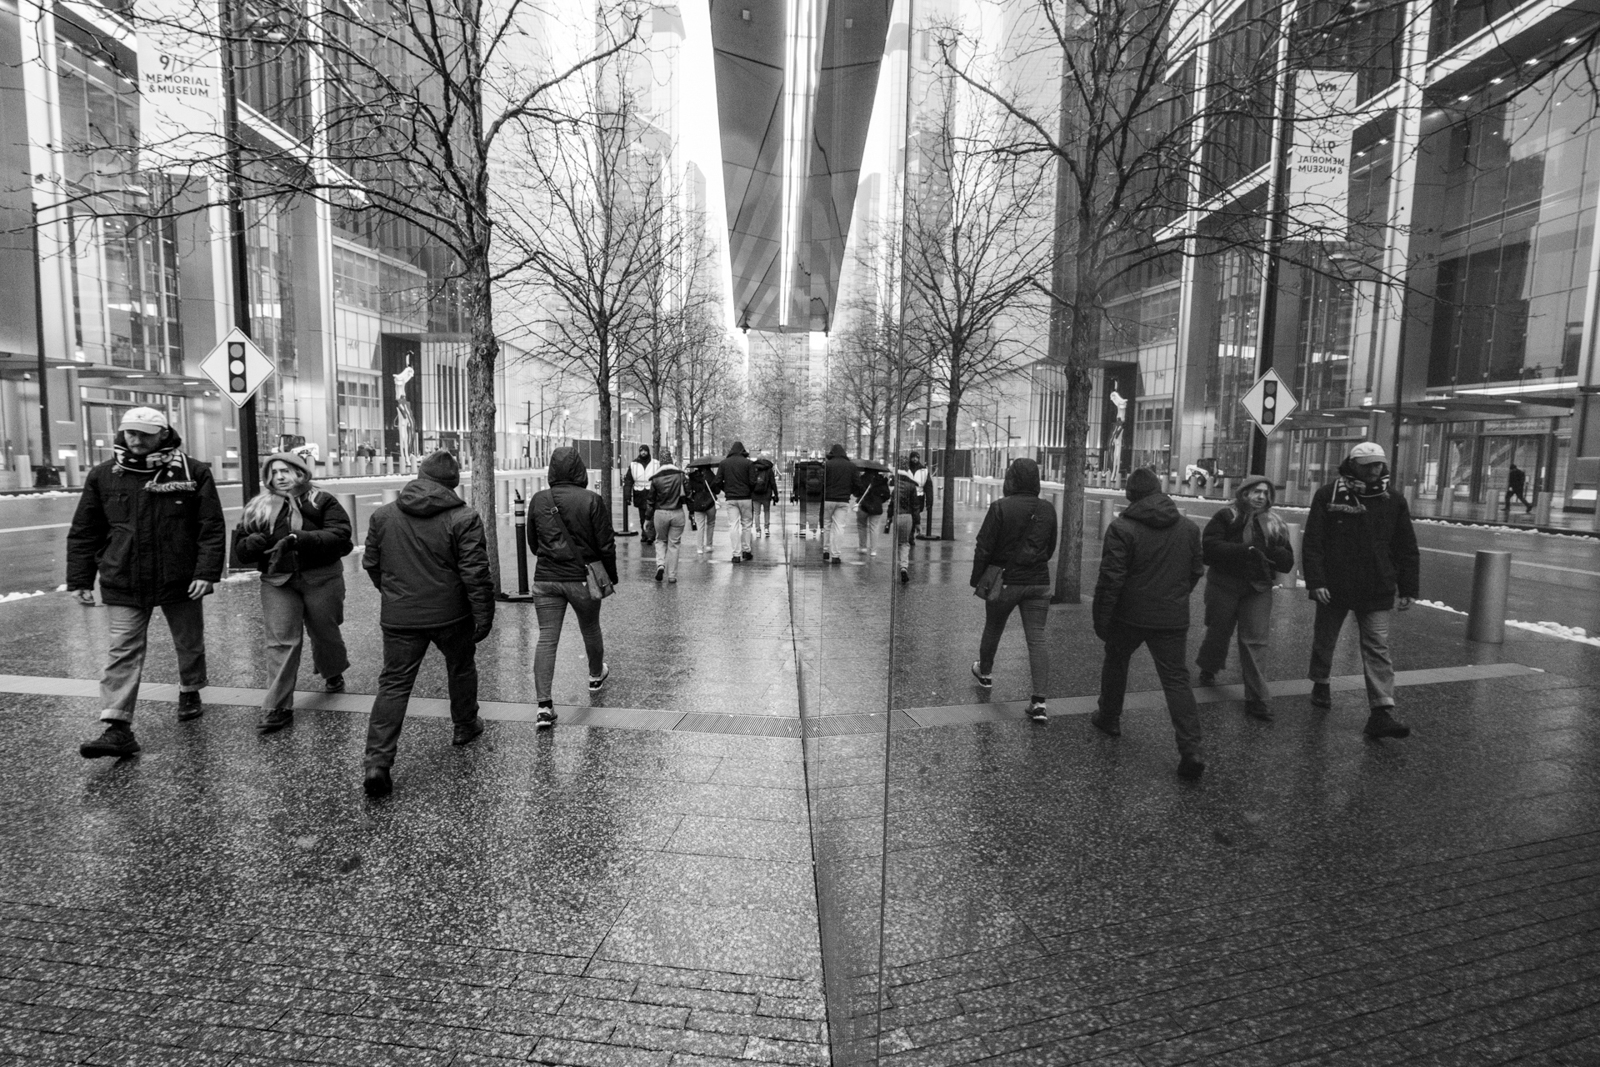
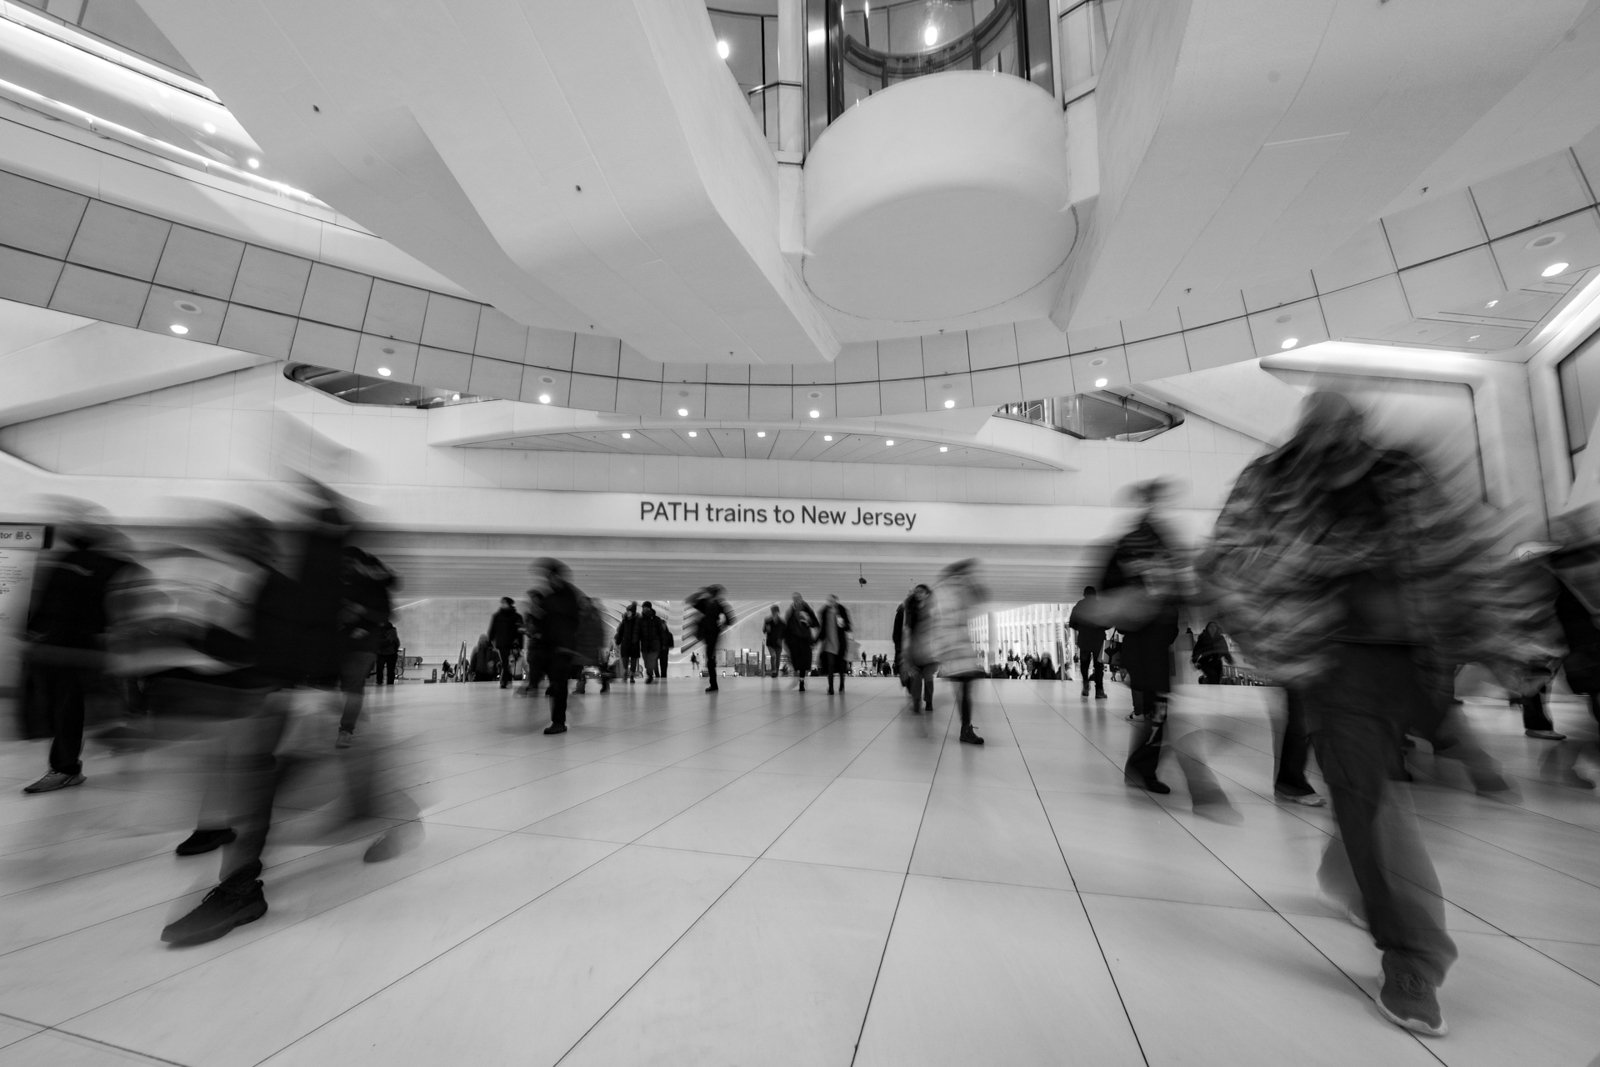
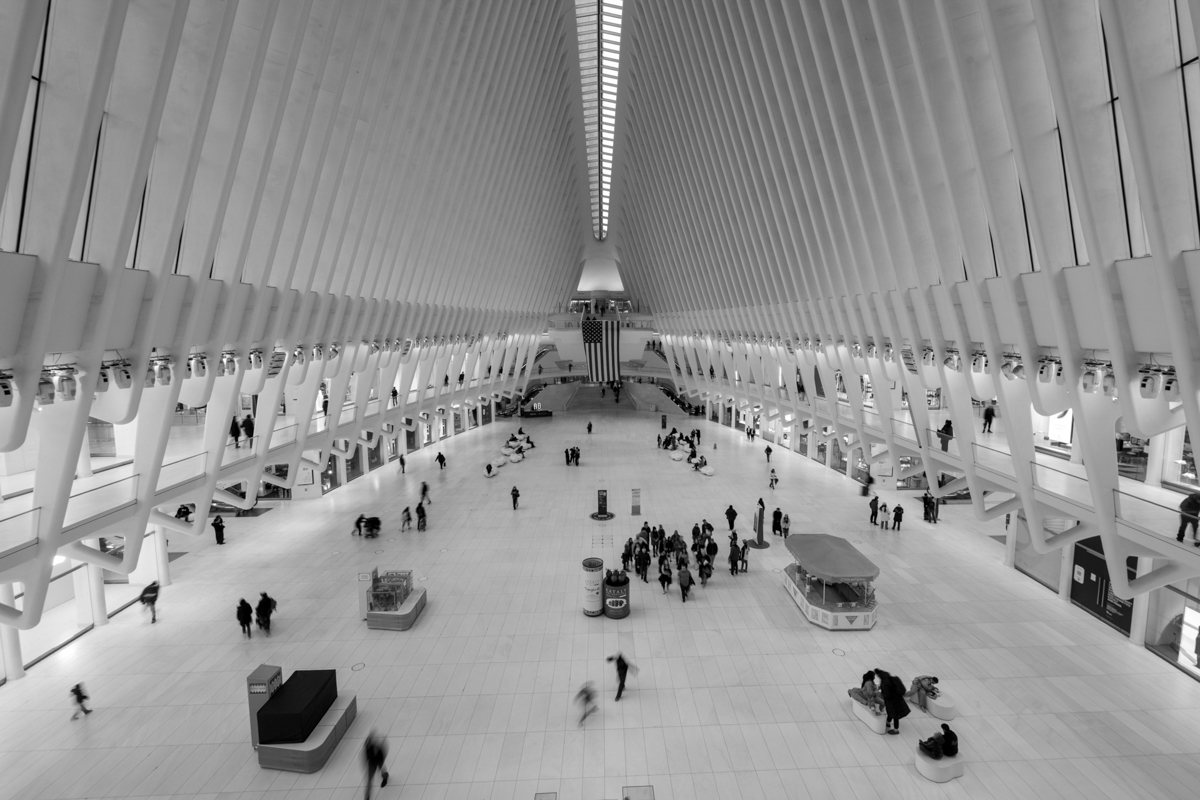
Day 3: The Icons. We focused on the “Fearless Girl” and the skeletal beauty of the Oculus, wrapping up in the vibrant streets of Nolita and the Lower East Side.
The 10,000 Photographs We often cite Henri Cartier-Bresson’s famous line: “Your first 10,000 photographs are your worst.” This weekend, I watched four photographers fast-track their way through that count, producing work that was mature, thoughtful, and evocative.
To our four students: thank you for your resilience in the cold and for sharing your vision with us. Seeing the city through your lenses reminded me why I love this craft. I’m already looking forward to our post-workshop Zoom session to see how those snowy, steamy frames look after a final edit.
Keep shooting.
Day One and Day Three images created using Nikon Z9, 24-120 and 14-24. Day two Fujifilm X100VI was used.
What do you think of making work like this in the deep of winter? Leave a comment.
DJI Mavic Air 3 Tele Lens, Processed in Camera Raw- Ready to print
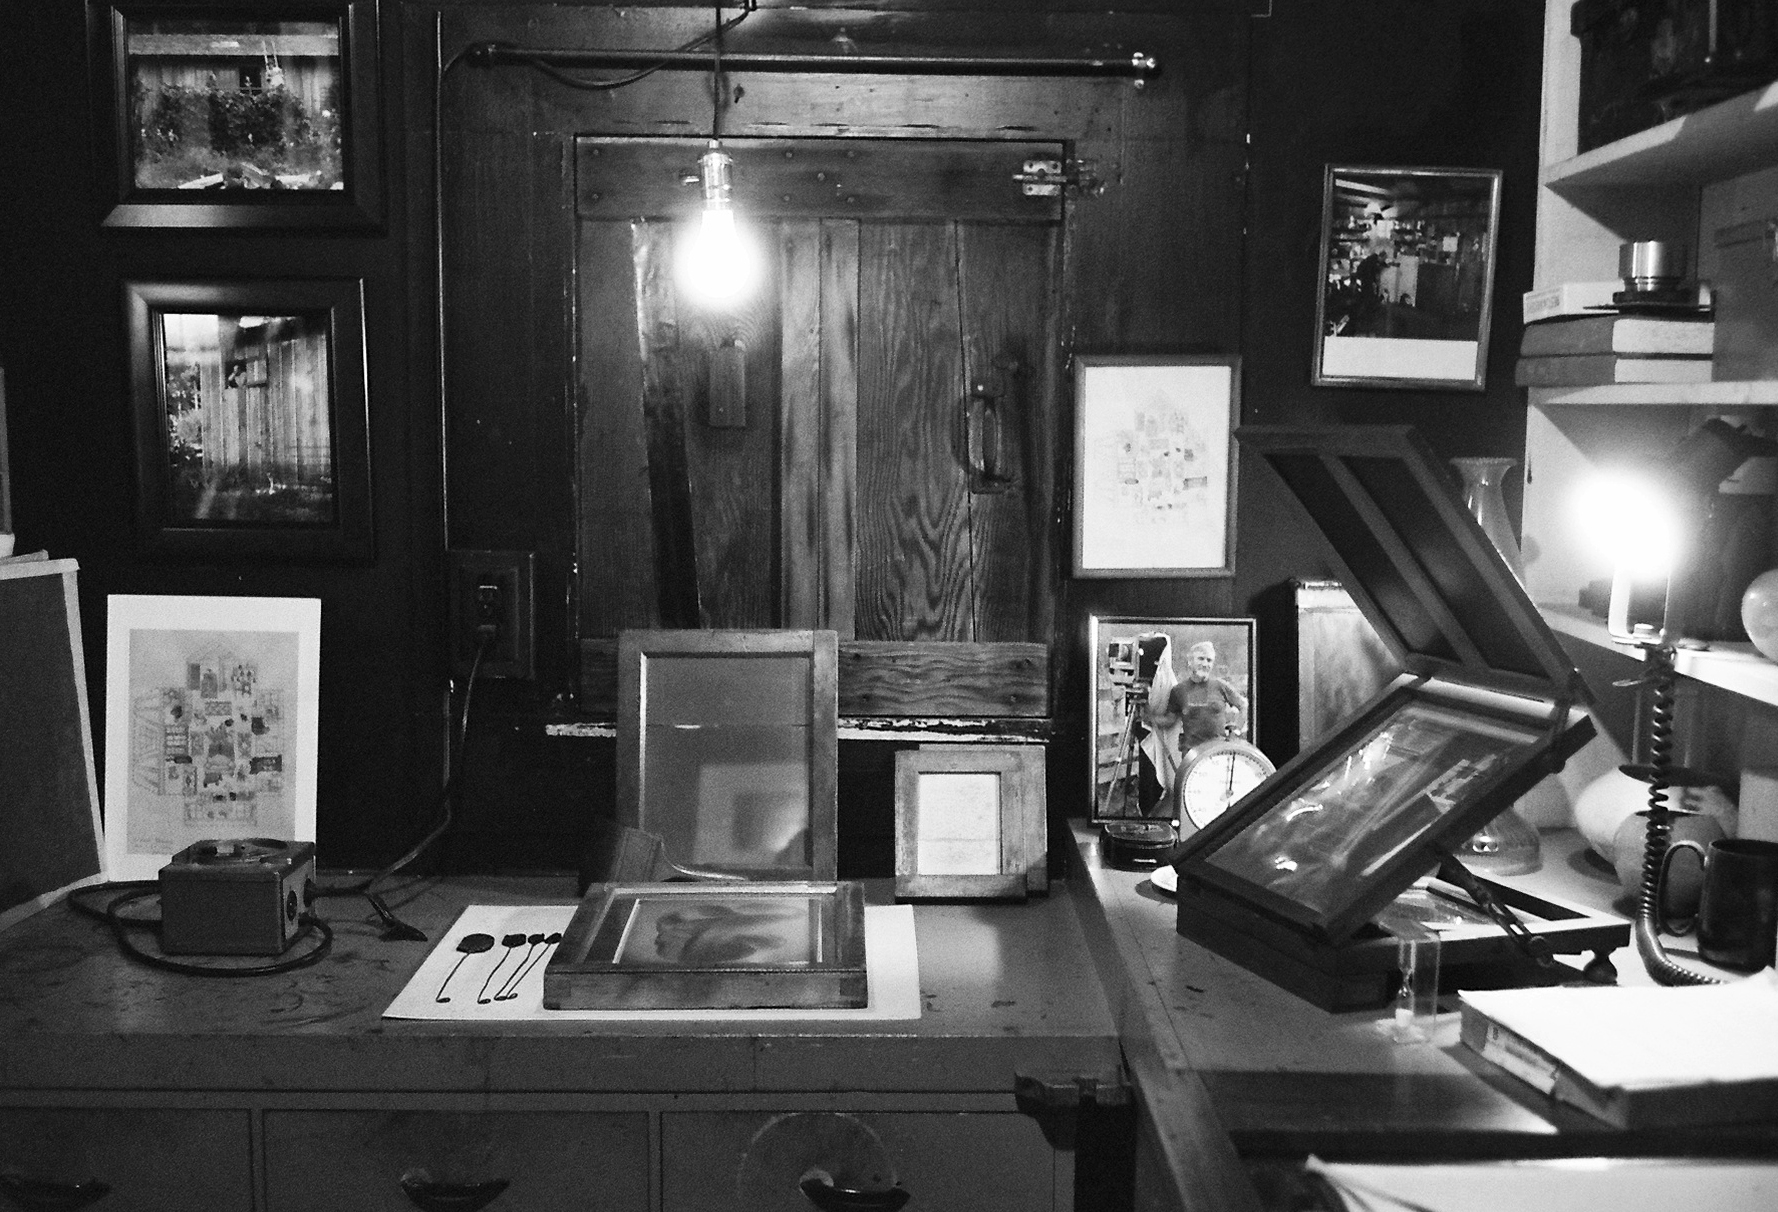
We’ve all been there: the meticulous packing of camera gear, the careful selection of lenses, and the anticipation of chasing light. We scout locations, wait for the perfect moment, and then, click. The shutter fires, the photograph is made, and a fleeting piece of time is frozen. But is that precise moment, that initial capture, when a photograph is truly “done”? Hint, it’s not.
For many photographers, the creation process of an image is far from over when the memory card fills. The initial capture is merely the spark, the raw material, a digital or analog negative holding immense potential. The process is a creative continuum that extends well beyond the field, into the necessary and transformative stage of editing. The digital darkroom is where your vision truly takes form; here you refine the light, enhance the mood, crop for impact, and bring out the crucial details that tell your story. This stage is essential in translating what you saw with your eyes to what you felt with your heart. It is the critical step of giving emotional intent a physical, visual language that speaks clearly to others.
Edward Weston’s Darkroom
The final act of creation is the output, the moment you publish, print, or post your photograph to its audience. This is when the work moves from potential energy to a tangible reality. Is it a gallery-quality print, carefully matted and framed, ready to hang on a wall and command attention? Is it a thoughtfully placed image on a page in a book or zine, contributing to a larger narrative? Or is it meticulously prepared and uploaded to the web or a social media site, destined to connect with a global audience, spark conversation, and inspire? Once you put it out there, it’s essentially done.
Snowstorm 8th & 24 NYC December 14 2026
A photograph isn’t merely “taken”; it’s made. It’s a process that begins with your intent as you pack your gear and culminates when it takes its final, finished form, ready to be seen, experienced, and remembered. Shared. It is done when you’ve expressed your vision to its fullest and prepared it for its intended destination, whether that’s a single discerning eye or the whole wide world.
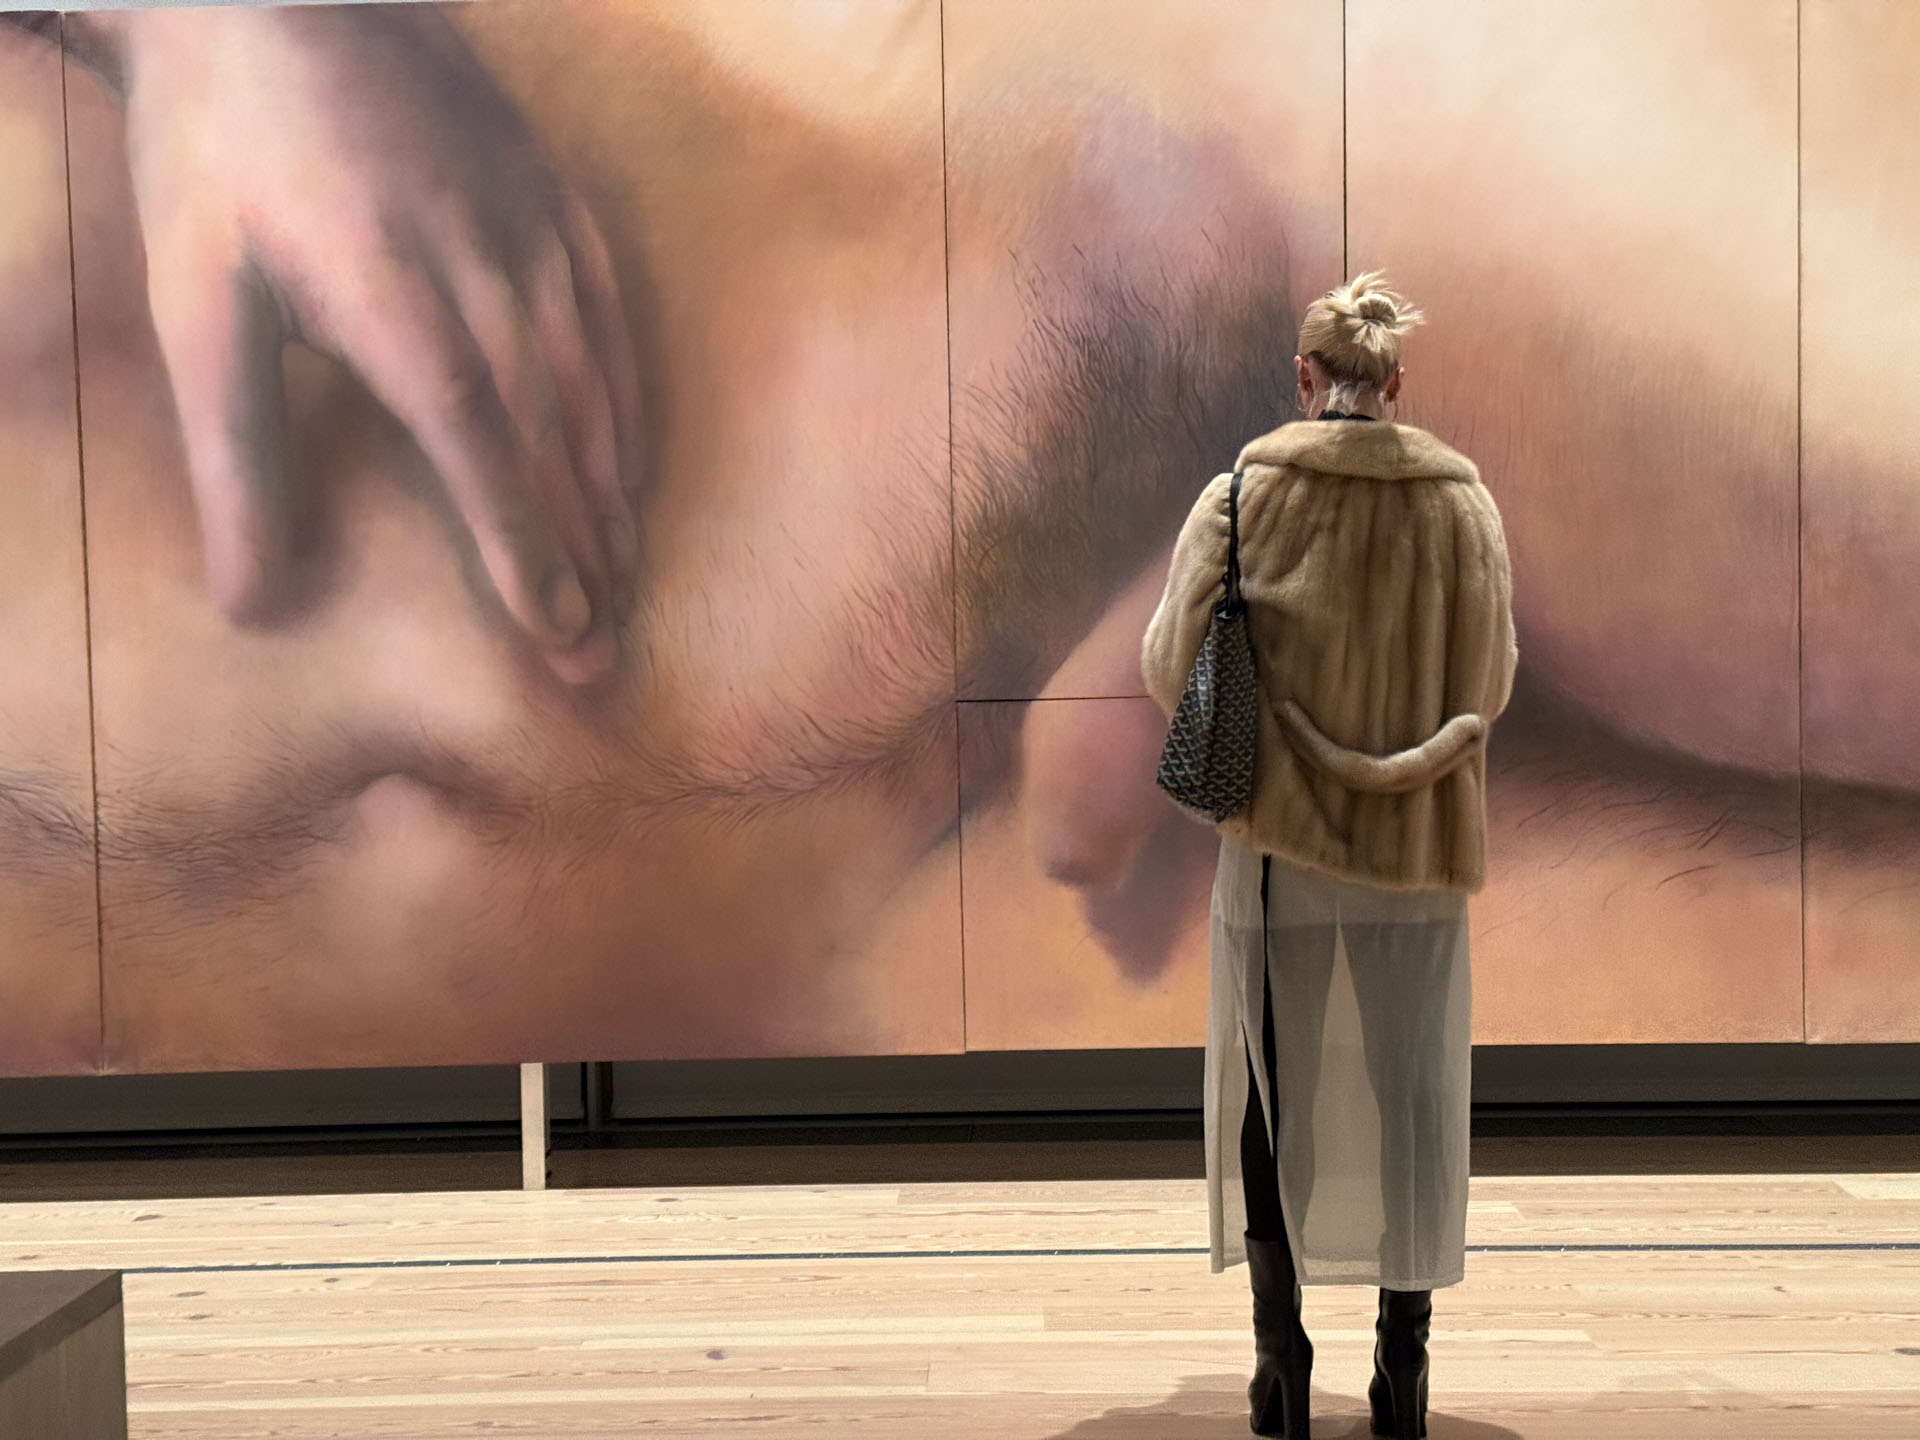
Warning, continuing with this blog post might contain NSFW images.
A few nights ago my wife Barbara and I attended the Whitney Museum of American Art’s holiday member’s night. When we were about to leave I reached for my Fujifilm X100mkVI and then thought better of it, we’d be going to dinner at Pastis afterwards and the camera would be a lightweight burden, besides, I have my trusty Iphone 16 Pro. What is the best camera? Yea, you know the answer to that if you’ve read this far into the article.
As we walked through the galleries, past surreal camels, we came upon this scene and I pulled out the iPhone and ran to frame and make this photo. The subject was standing still, admiring the piece and my usual luck is “get in position, subject moves out of position”. But not this time. I was able to make a few photos fast zeroing on composition.
Crooked horizon, poorly cropped feet.. my first shot was off.
Made some corrections and then she began to walk away. The window for this photo was over. However, due to all those years of making bad photos I was able to capture a good photo. Later that night I sat in bed editing the image in Apple’s proprietary editing suite and adjusted to this final image.
Was it done? Not quite yet, I then uploaded to my instagram and now….
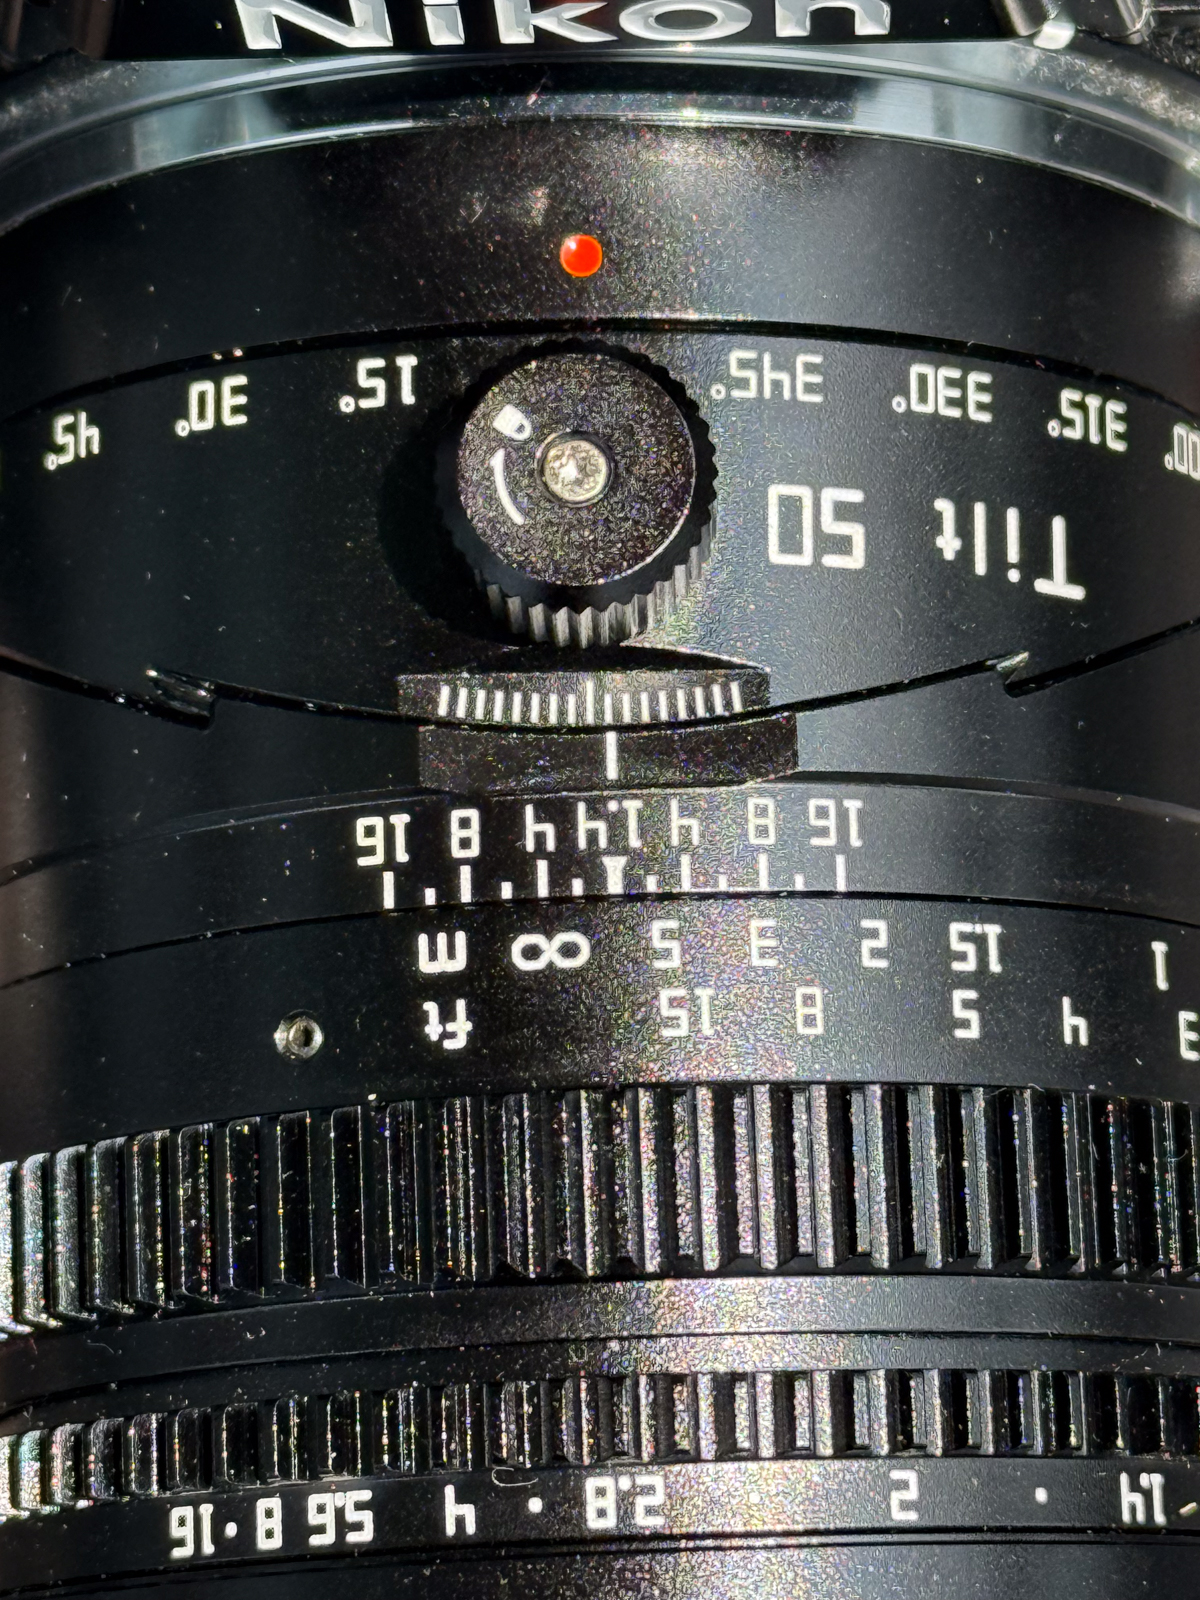
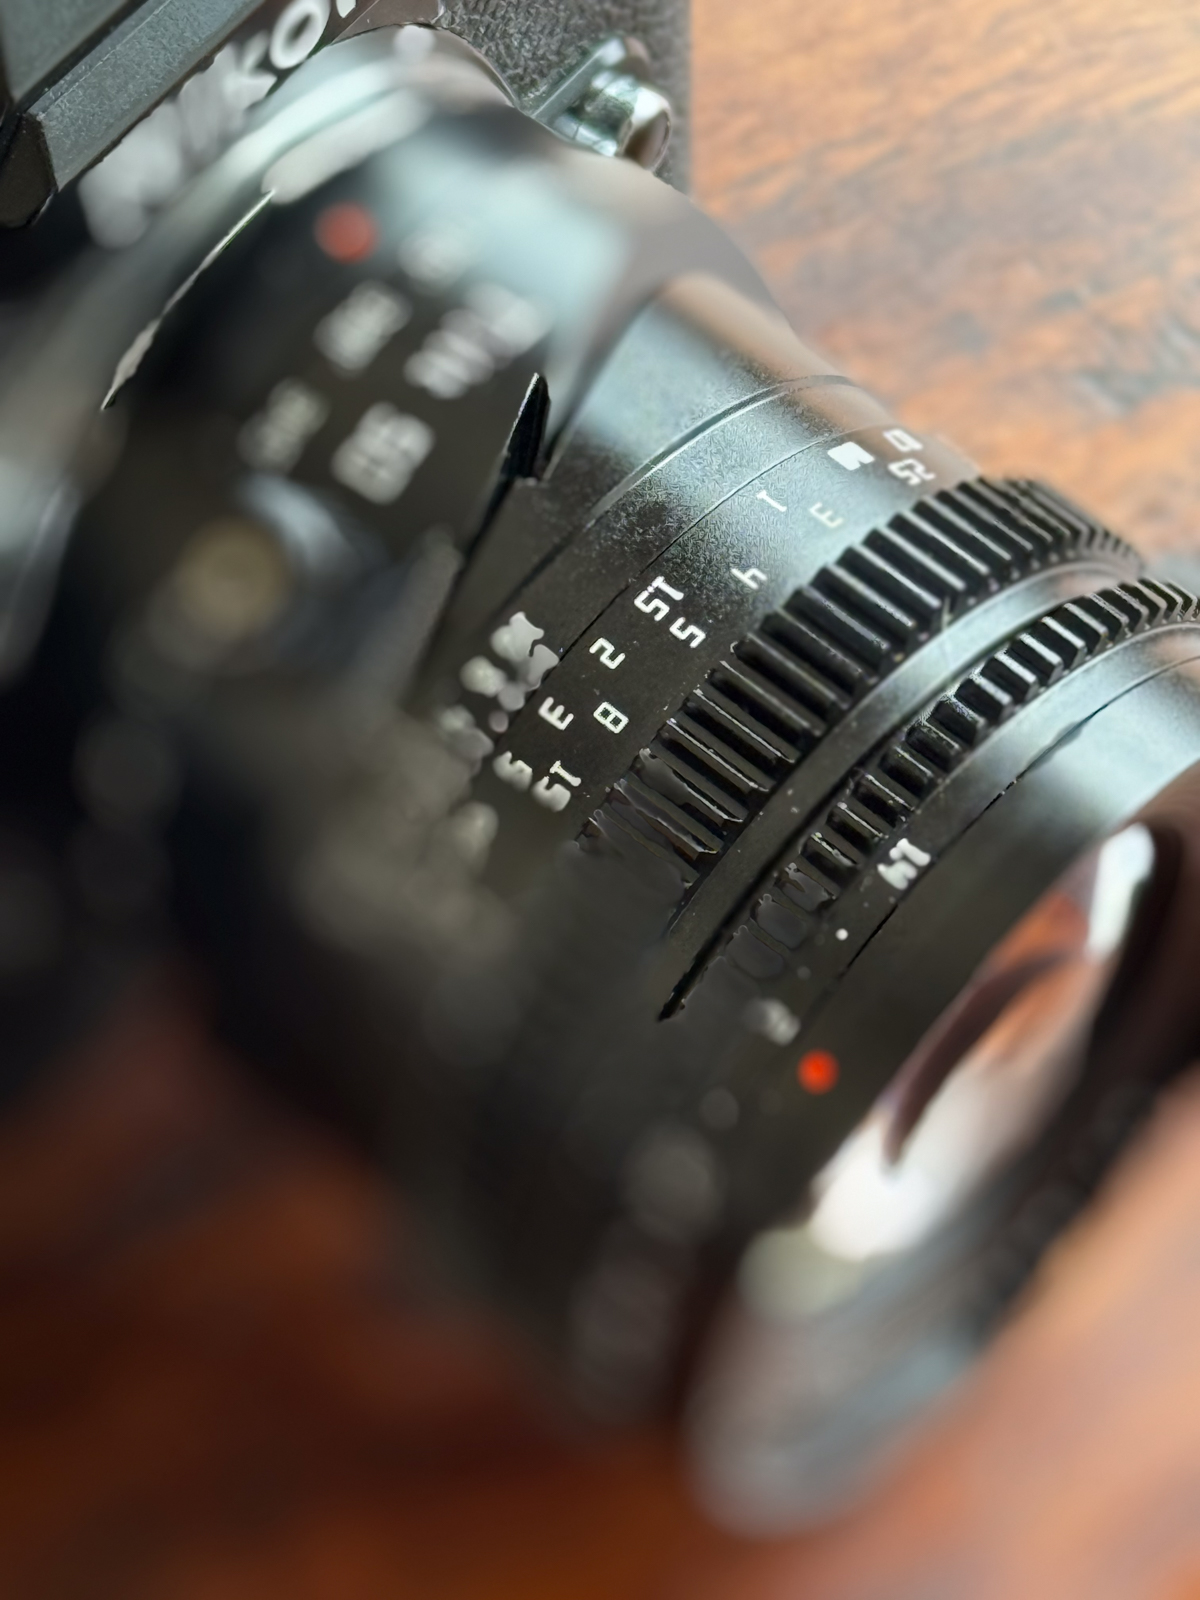
As many of us, I’m a gear freak and love optics. I was poking around the Nikon Z lens options on the B&H Website and came across this lens, the TTArtisan Tilt 50. It’s part of this wave of ‘cheap cost’, but ‘not cheaply made’, Chinese lenses. The 70’s were a hey-day of weird, wide, and tele lenses from oddball companies; and then in the 2000’s Lensbaby hit the market. Now with the rise of easy manufacture (barring tariffs) lenses, and manual film/video lens needs, there is a plethora of this type of equipment to try out. Long story short: I bought the lens on speculation, and was pleasantly surprised on all fronts!
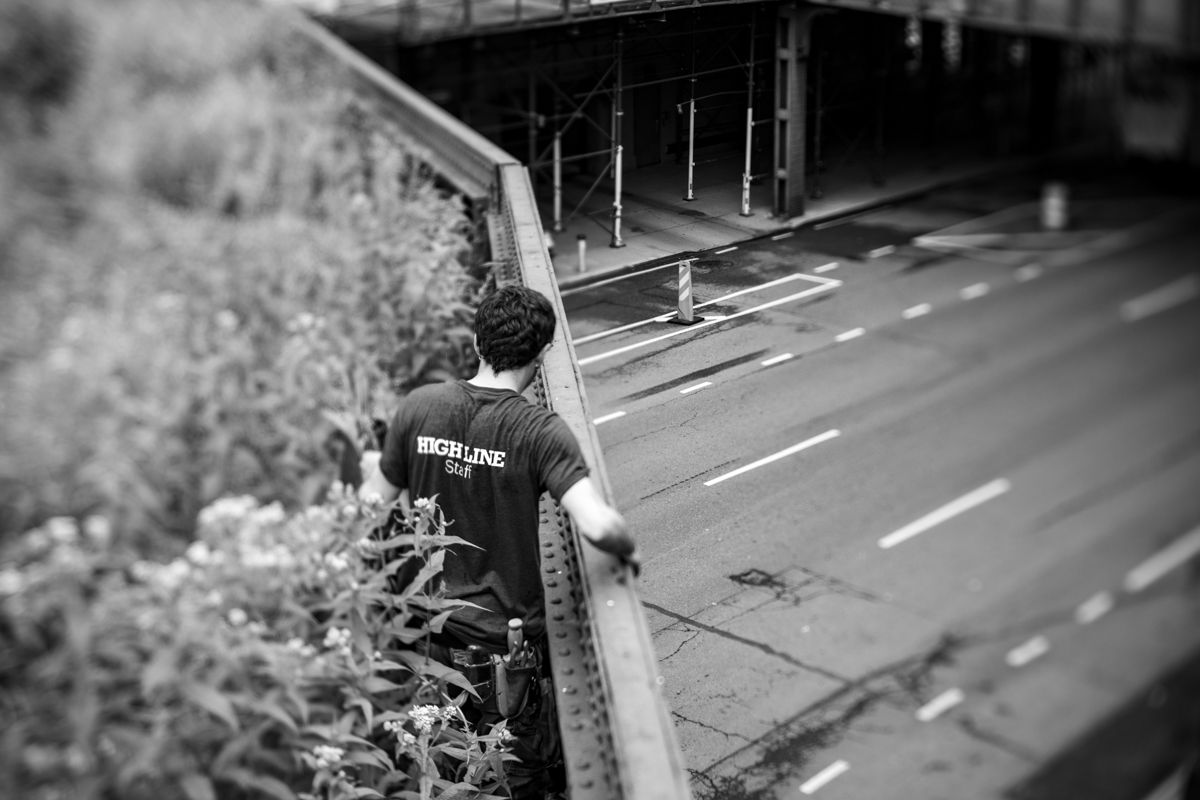
I slapped the lens on a Nikon Zf with focus peaking turned off (I found it hard to “see the image” with the shimmering distraction), auto iso on, aperture mode, B&W switched on, Raw. Making sure “ok to shoot without lens” setting is checked. I took a morning stroll on the Highline excited to try out this fine feeling lens.
The lens has two unique controls, one for the tilt and the other direction of the tilt axis. By strategically turning these two, in tandem with the manual aperture, you gain access to a “strip” of in focus view. You can “spin” the lens to make that strip go anywhere. The lens also has a wonder full depth of field bokeh and close 19.7″ / 50 cm minimum focus.
The actual sharpness of the lens is questionable, it’s not a view camera, but that’s not the point. Straight on at F8 it’s sharp, but it falls off the more wide we open. However I found it sharp enough to certainly buy and keep in my gear bag. It’s fun to use and produces unique results.
The lens likes height to give it perspective. Walking the Hhighline was actually perfect with its vantage points and strong horizontal lines.
We cruised out to celebrate the fourth of July out in the Hamptons in the Buick and I grabbed the same combo.
Couple of notes, you have to have deft and strong fingers to maneuver the tilt and rotation functions. A tripod couldn’t hurt, but I used it handheld during my exploration of the lens.
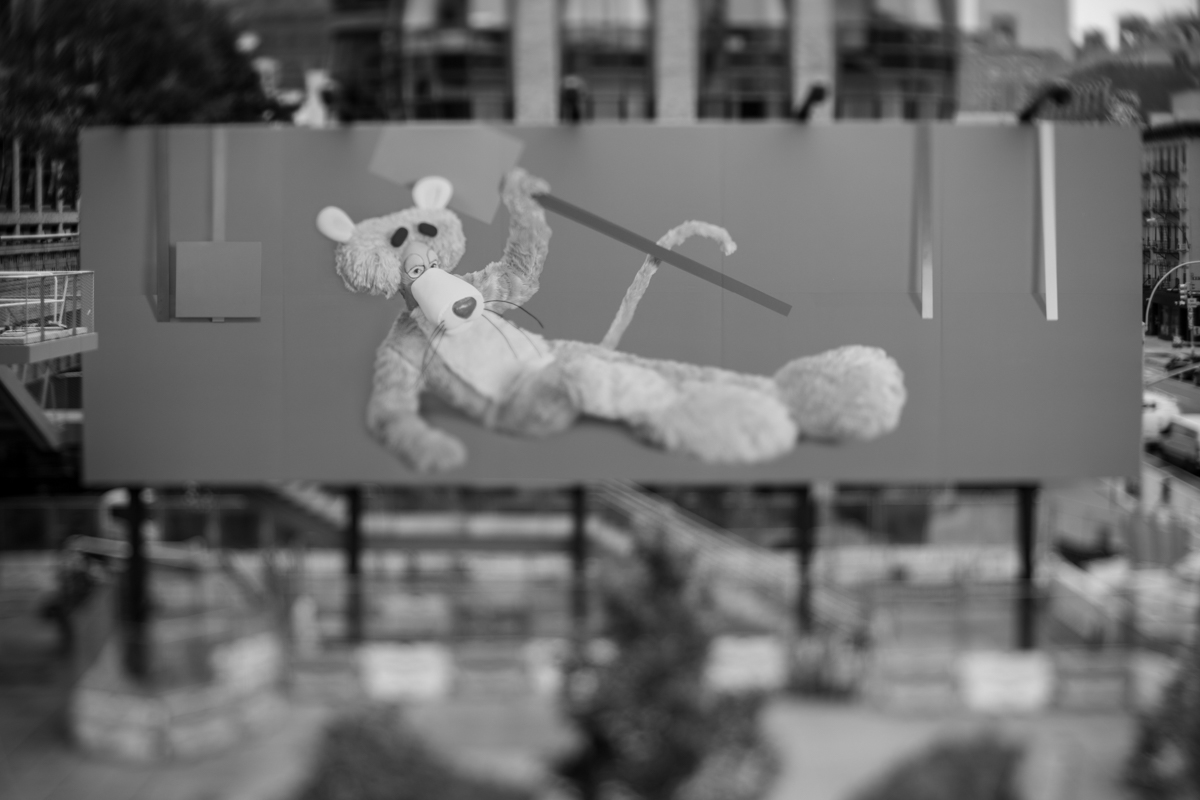
My favorite wall north of MoMa. Vintage camera wall by Brandon Remler.
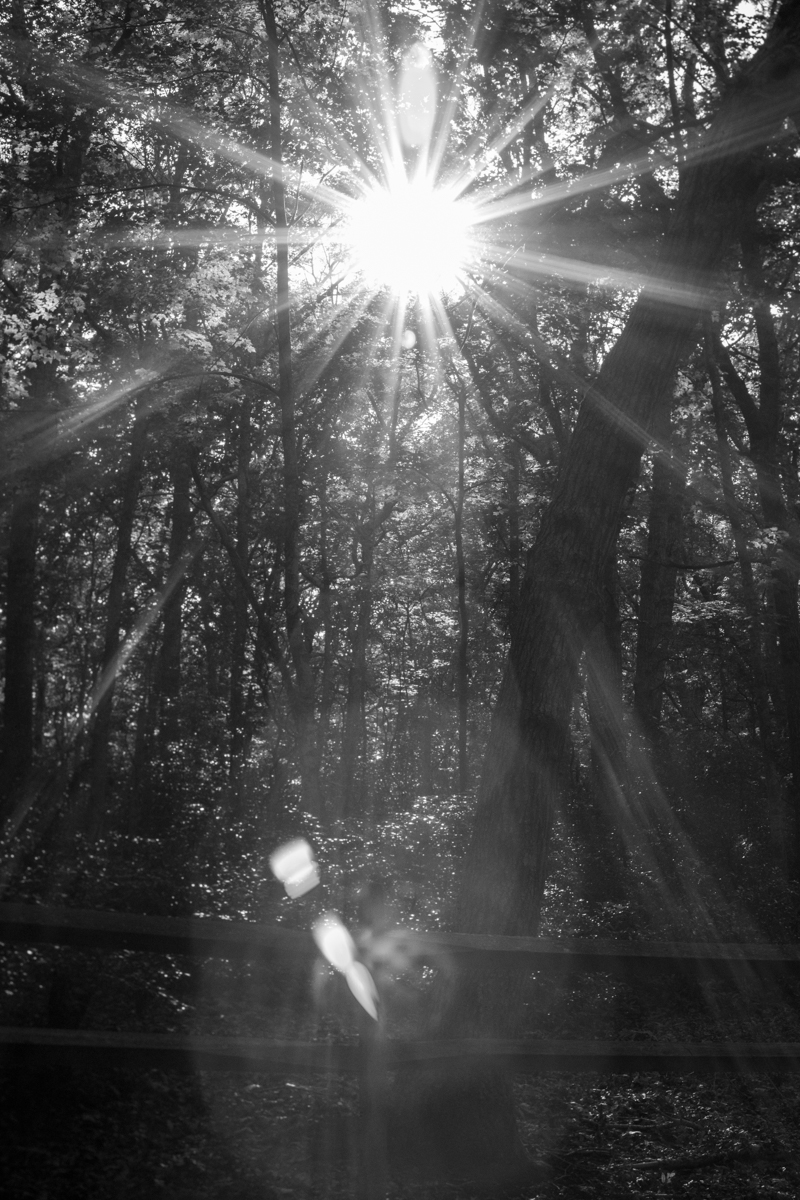
Shot this one at f16 amined up into the sun through the trees. I wanted to see how much wackadoodle the flare would cause. The result, enough!
Shooting the Tilt 50 at f. 2 to 4 seems best. Shooting wide open at 1.4 makes the circle very tight. Opening up two stops is the “sweet spot”. It’s the dreamy effect. I dig it. Is it gimicky like full frame fish eye? yes. But the Tilt 50 does have its place. I’m thinking a start and finish workout project, shot only with the Tilt 50. The tilt effect makes things tiny and if used correctly, can help telling the story by highlighting via focus on subjects.
I don’t recommend it for straight shooting. Not having the effect makes it less desirable, but still, the bokeh is outstanding and for the cost… Certainly less than Eisenhower’s collar.
That’s the great night photographer Gabriel Biderman and the president of the Duran Duran fan club, Nancy (only kidding, Nan is one of the finest people I call a friend). But in all seriousness, this image illustrates the way the tilt 50 can assist story telling.
It’s a heavy weight lens at 15.9 oz / 452 g. The focus is smooth as well as the click less aperture ring for those who might consider using it for film making. Which by the way, I suspect would be outstanding. Like a way to shoot a memory or a dream sequence. The lens also has satisfactory knurled rings if you were to use with a follow focus device.
Here’s my plan. I’m keeping the lens. At $229 using a payboo card it has great potential with insignificant investment. In the spring I bought the 14-24 2.8 S lens and love it, but at it’s hefty 2k price it doesn’t do what this little extra nifty fifty can do. It comes in all the mounts including Fuji X, Canon, Sony and micro 4/3. Go buy it at B&H and tell me how you like you it.
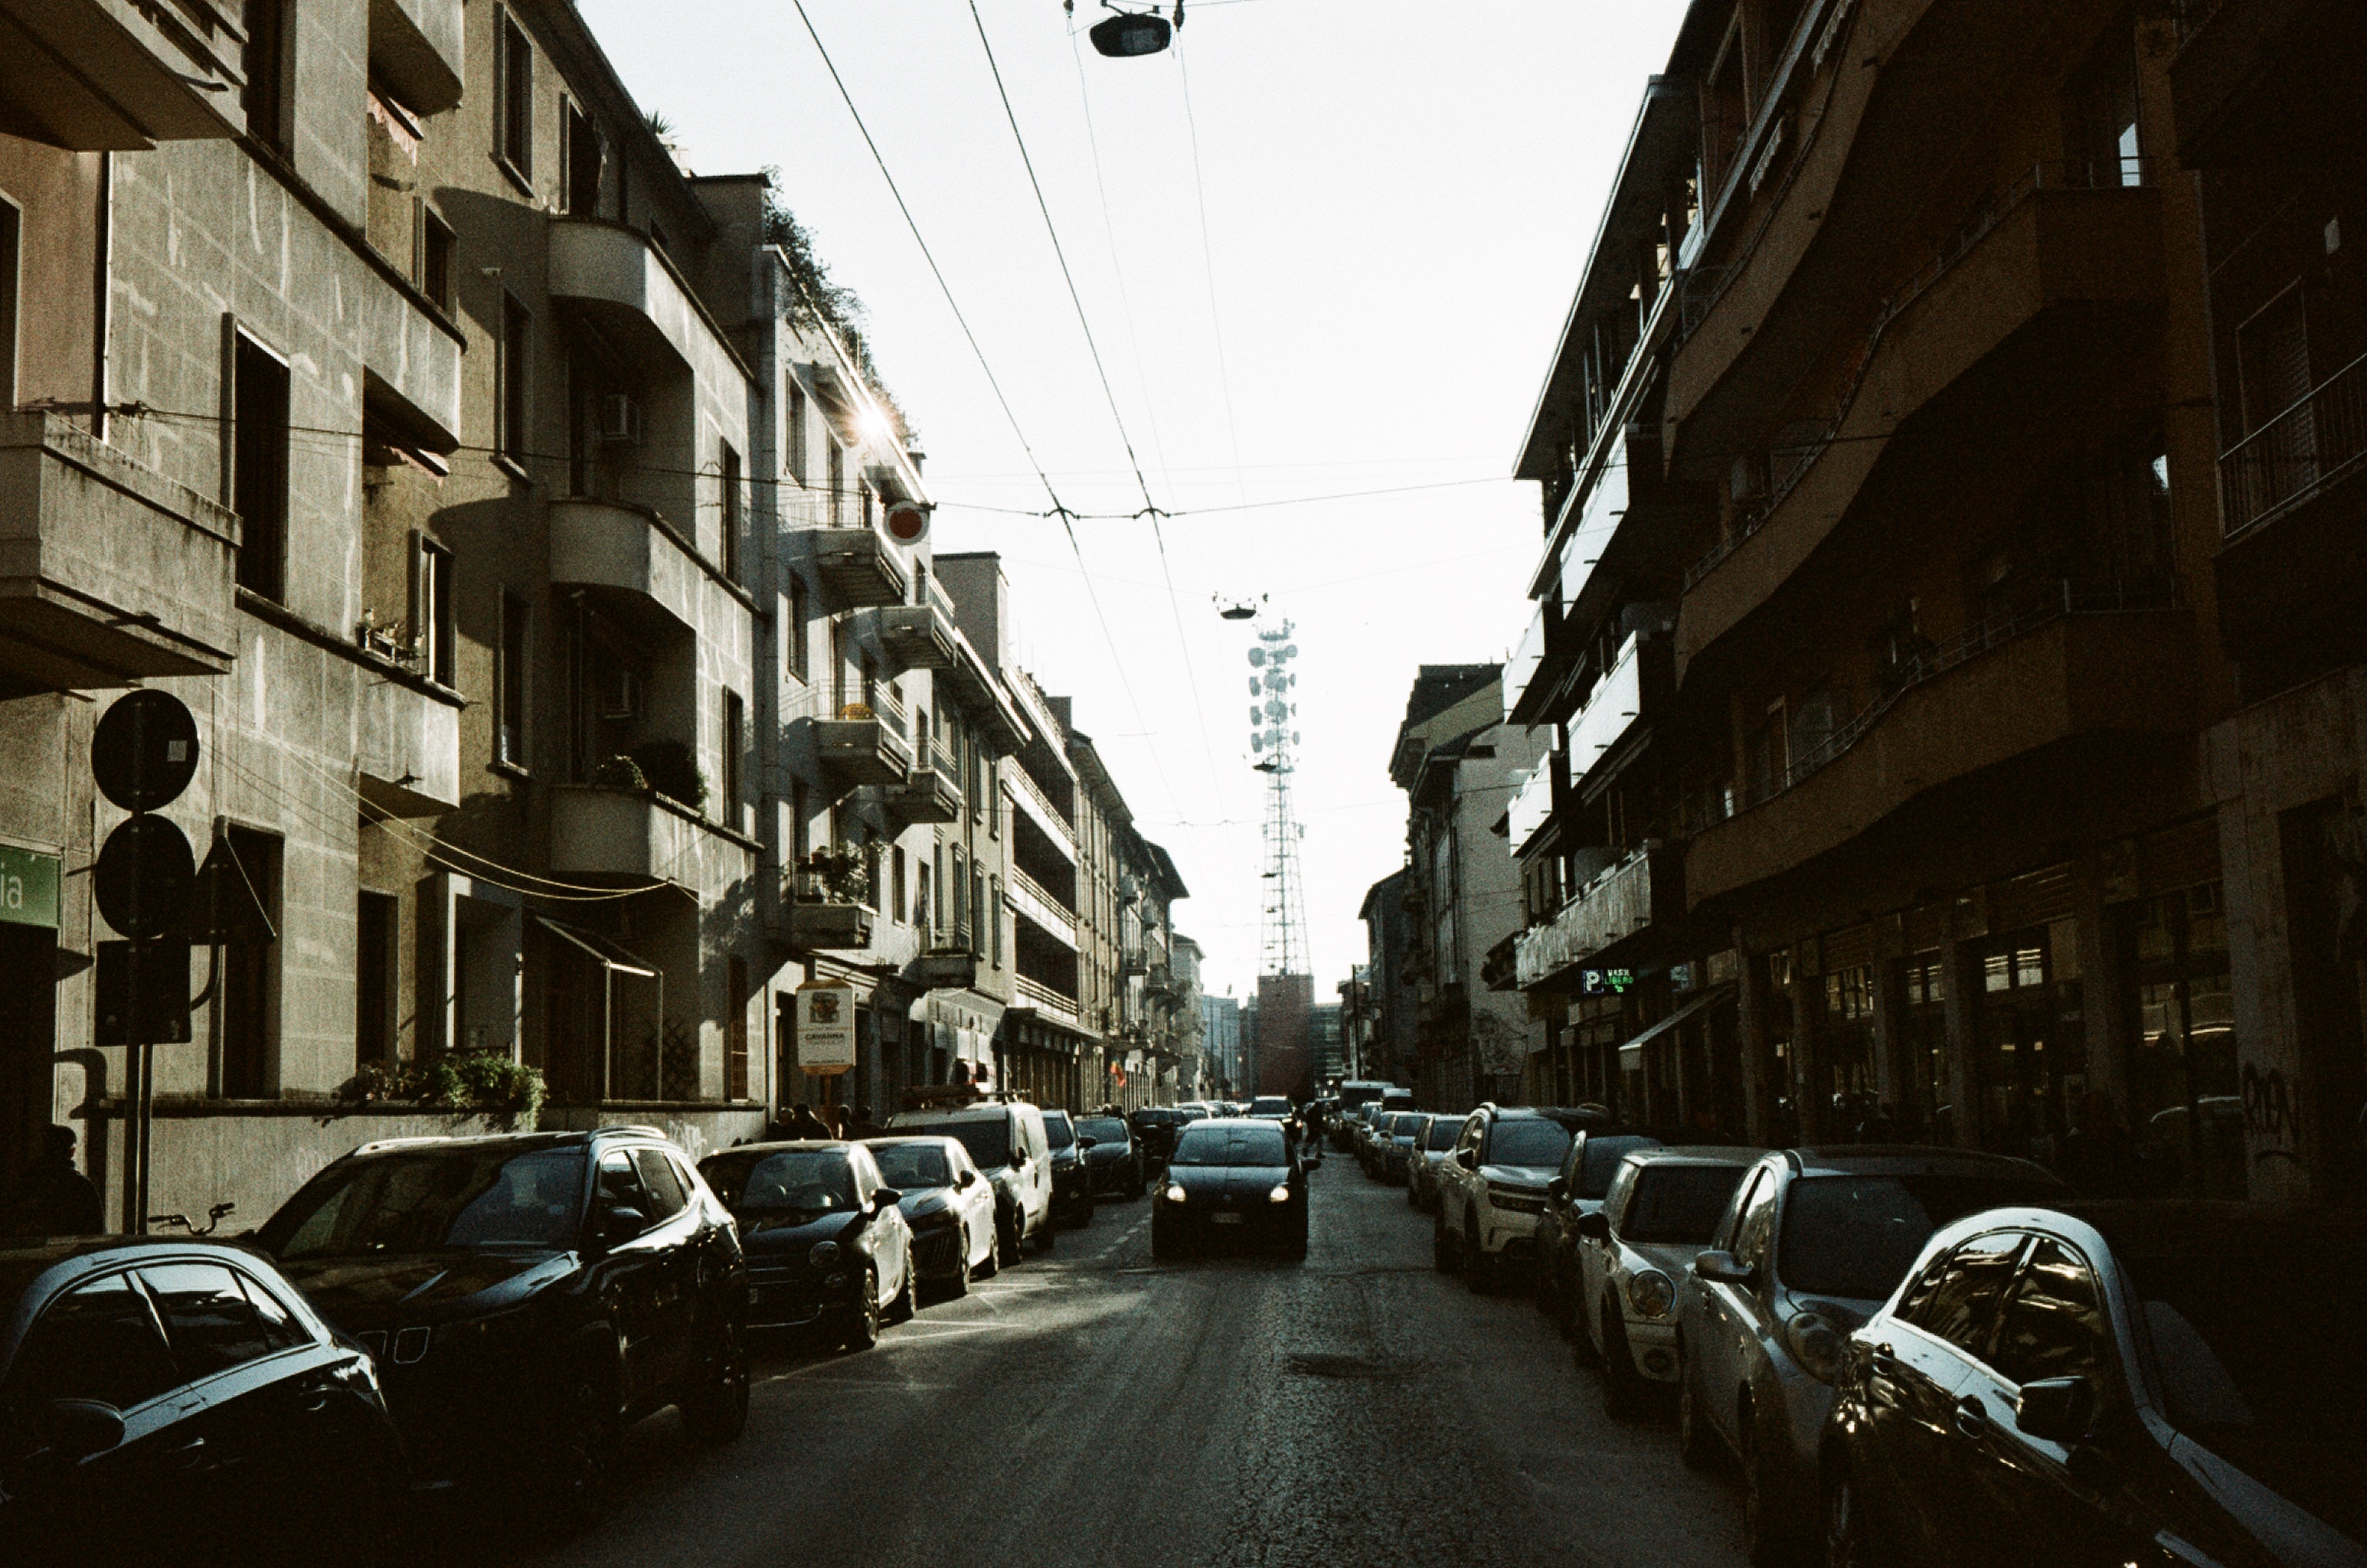
Photography is a drug, it can be your savior, a north star in times of trouble. I mean it, when you lift the camera to your eye and view the world through the view finder native troubles are sidelined and creating the image takes center stage. Recently my wife Barbara and I had to drop everything and take care of her aging mother in law in Milan. While we braced for the worst, the little lady has recovered and we are back in NYC.
The following text is a the narration from the slide show you can view on Youtube.
This family calamity had moments of full attention and lots of down time. Using the down time to mitigate the situation would lend peace and purpose to this dark time. So I did what every self respecting photographer artist would do and make a “creative plan” that is really art therapy. Taking stock of what I had and where I would be I vowed to push myself to its completion.
Setting parameters.
Before leaving I took stock in front of my antique breakfront that houses my camera collection. The task ahead was a heavy one, and I wanted to reach deep down chose a camera that is challenging (requiring focus) and inspirational. Recently I swapped out straps on my gorgeous Nikon SP (the rate 2005 reissue) and I was keen to bring it into the field. It had been over a year since I ran a roll of film through the camera and it’s always a pleasure to use, the camera feels so good in the hands. What optics to bring? For Lenses would be a 35mm 1.8 and 25mm f4. Check. I also have a new iPhone 16 Pro Max I had just upgraded from my iPhone 13 so that would be my “mobile sketch book”. Check. Because I am a serious photographer and I have been so successful with my current camera set up, I packed the Nikon Z9 and the super versatile 24-120 f 4. Along with two laptops (my airbook and B&H work laptop) I stuffed it all into a Tenba back pack and along with Eisenhower my faithful Chihuahua I jetted off to Italy.
We are staying in the Bovisa neighborhood of Milan and there is an old school film lab around the corner from the flat, “Speed Foto” that maintains a nice selection of used analog cameras they display in the window and a great selection of different films. After sorting out important health obligations I eagerly headed over to peruse what vintage cams they had and most importantly, buy a few rolls of film to shoot. I picked to something weird, Lomography “lomochrome” film in a three pack. Each roll has it’s own color funk, turquoise, metropolis, and purple. The process is C41 but I after shooting with them, I surmised they are a slide film (positive) that are maximized for C41 process making them negatives. The formula and process makes odd color shifts in different spectrums. The results are weird as you can see from the below work.
I resolved to finish those rolls in the 12 days between flights. I felt the first roll was getting into form and getting used to the camera which is requires lots of work for urban street photography. The camera is fully manual exposure and focus. Due to its compact size, changing aperture is difficult and the view finder for these old eyes is challenging. I brought shoe mount meter, but the on switch stayed on during the flight and the button battery was dead. I resolved to go meter less and use my years of intuition to guess the exposure. A few days in I wanted to see how accurate I was and downloaded the Lux app on the iPhone. 9 times out ten I nailed it.
The above parameters made for a very exciting photography distraction. I got to make some work, challenge my skills and focus on photography in a total way. I have a new found appreciation for how good the modern Nikon Z series cameras are. The Nikon S rangefinder system is 1950’s, my Z9 and Zf are post covid tech- 2022, a whopping 70 years of photography progress! It shows in every aspect, but I have a saying, “you have to know where you came from to know where you’re going”. The mini project fulfilled that in a profound way. I’m also happy to report that Mom is recovered and doing well. She has a bionic enhancement of a pacemaker, but her body is 1930’s. She’s like the Nikon SP and Nikon Z9 combined!
It’s been one year since I reignited the fire that is Suspect Photography and struck out on my own by leaving my position at B&H Photo after 26 years. The year, with its unexpected highs, reinforced my decision that the time was right for change and investing my efforts into what had begun all those years ago in 1993. Suspecting so much was possible when you take smart chances. Here is the year in review for Suspect Photography.
I resigned from B&H on Halloween Day 2023, like I had started on Halloween Day in 1997 working the camera counter (where I always felt comfortable). That night I celebrated with Barbara and My Life with the Thrill Kill Kult at the Bowery Ballroom.
I started to have lunches with other teaching photographers in my network and was offered partnerships. Maine Media Workshops, which had been such an influence in my early marketing days, offered me the opportunity to lead a workshop in the fall of 2024. I began to map out a plan. I literally ‘broke the ice’ on a cold Winter weekend with my first workshop I co-taught with Steve Simon (the Passionate Photographer). An ambitious Milan workshop followed in April.
On a solo Washington Square Park Walkabout, I also met a photographer who would become a star student of mine, to prove that acorns do indeed become oaks (thank you Kim C.).
My plan entailed activating my old network and buidling & promoting some intricate educational programs such as the Spring NYC UN Workshop and a Fall Photo Retreat. Digital infrastructure and offerings were promoted and executed with live zooms and edited videos.
An online audience was growing, and websites were built while workshops went off flawlessly. Suspect Photography along with partner the Passionate Photographer sponsored a table at the International Photographers Council UN Awards Luncheon.
To see that logo alongside the best the photo industry offers, and a full table of students to share the experience with, was a momentous occasion. And all this only six months into the rebirth of Suspect Photography! (We have already filled the NYC Spring UN 2025 Workshop, but you can join the waitlist here.)
What has been truly thrilling this year has been getting to be a photographer and making work daily. It’s true that if you practice it, you will get better. It’s hard to juggle a full-time intense job and practice photography. This year was the year of photographing in the streets for me, and thus I discovered what was missing in my definition of the genre, humans in the photo.
I learned so much, and made a number of images I’m quite proud of, including one, “Personal Jesus”, that won a street photography online contest. I owe this mostly to Steve Simon, who opened my eyes and challenged me to be the photographer I wanted to be and supported my educational aspirations. I took my Street Photography practice in a formal manner not only in NYC, but to Paris, Mont Saint Michel and Milan.
The Milan 2025 workshop is live and taking deposits, so be sure to secure your spot.
I spent a hot summer in Italy continuing to plan future workshops. My north star was building a workshop and retreat that I would want to attend myself, and so Suspect Tulum, a Photo Workshop in Paradise was born!
I first went to Tulum in 1982 with my family and have returned many times since. It’s one of my favorite places on earth and I can’t wait to share it with photography lovers.
I also dig the woods. Like a real lot, and have always been hiking and exploring them from the Appalachian Trail to Denali. I’m a big fan of Tree Beard the ‘Ent from the Lord of the Rings and have dreamed of creating a photo school in the serenity of the woods, so I created Suspect Photography Retreat In the Woods! I recruited the best of the best instructors and Barbara found the ultimate place to conduct the retreat, AutoCamp in the Catskills, featuring deluxe Airstreams sprinkled about pristine Mountain woods.
Expert instruction: Check! Killer Location: Check! Styled Models: Check! Workflow and a Printed Portfolio of the work- CHECK. Located in the Catskills, B&H Photo is providing shuttle service from the Super Store to Retreat and back. All the boxes are checked! Tulum has a limit of 6 students and the Retreat 25. They are filling up. Dream big, the only limit is one you set yourself.
At the start of October I brought Finding and Developing Photographic Style to the Maine Media Workshops. That “acorn” I met at Washington Square Park back in January, along with a student from B&H’s Portfolio Development Program and a few new students, criss crossed across the Maine mid coast diving deep into my theories of photo style. It went so well I have been invited back. Stay tuned to the Suspect Photography Newsletter when registration goes live.
I’m spending the fall of 2024 doing photowalks and building the 2025 program. It’s very exciting. I hope you can be part of it- join a workshop or come to the Retreat. You’ll invest in yourself and have a great time.
Our complicated world can be understood with the power of images, so it truly pays to practice Photography. I can’t wait to see how the next year plays out, and I hope you can join me along the way. Did anyone say Street Photography in Paris?
There is no doubt that vintage film cameras are cool and there is something special about shooting film in the digital age. This workshop is for those who want to connect with a mechanical camera to express photography the way it was in its heyday of the 60’s, 70’s, 80’s and even 90’s. David Brommer has never abandoned film photography and has a massive collection of “vintage users” he maintains.
Dates: June 2nd, 2024 9 AM-5 PM
Genre: Analog Street & Urban Photography
Group Size: Max 5 participants
Skill Levels: All
Includes: 3 rolls of film, camera rental, film processing and scanning, breakfast and post workshop group zoom.
Cost: $350.00
In this special one day workshop he will open up his cabinet of cameras and let you choose which one to shoot with during the day. Fancy a Hasselblad medium format? We have a red one with three lenses. A Nikon? Take your pick of SLR or Rangefinder. Want to experiment with a half frame 35mm? The Olympus Pen F is your camera. For those who want precision, grab the Contax with Zeiss lenses, or go instant with Fujifilm Instax. You may also bring a manual camera you inherited or were gifted and want to learn to use. You’ll have three rolls of film to work with during the workshop.
The focus of your day will be street and urban photography. This includes people and architecture with an emphasis on compositional elements. Film photography can be fun and surprising and each film emulsion has a look all their own. This workshop will give you a firm grasp of the basics of mechanical film cameras, exposure and composition.
Nikon FE 50mm Nikkor 1.4 Ais Fujifilm Superia 400 Converted to B&W (note the grain)
The day begins with coffee and bagels while we get a lesson on how to load film into your camera. After a quick rooftop photo op and exposure discussion, we take to the streets and head to little Island on the Hudson. Crossing the West Village we stop at the “secret garden” and continue east to the photo paradise of Washington Square Park and grab lunch. We then visit the Photo Lab 5R for a tour and workflow discussion. From there our walk continues to the Alamo and the East Village ending in Tompkins Square park. Cameras will be collected and film dropped off at our lab. Just like in the hinter years, you will get to look at your work about a week later after they have been developed, scanned and emailed to you. A few weeks later we will meet on zoom for an image review.
Nikon FE 50 mm 1.4 Fujifilm Superia 400Nikon FE 50 mm 1.4 Fujifilm Superia 400Nikon SP 35mm 1.8 Kodak Tri-X with Shitty Iphone Scan
Each student receives 3 rolls of film (B&W & Color Options) that includes processing and negative scanning. (Prints available at additional cost). Breakfast included, lunch on your own. Workshop is rain or shine. 2 weeks after the workshop a group zoom will be conducted with student submitted work to discuss and review. Class is limited to 5 students.
Cost: $350 Includes three rolls of film, camera rental, film processing and scanning, breakfast and post workshop group zoom.
March 25th we lost a lion of the photographic world, beloved by all who worked with him during his illustrious career, and a great sharer of vast knowledge, Photographer Mel DiGiacomo has shot his last photo.
If you are unfamiliar with Mel, A great place to start is watch the 3 minute highlight reel that the talented Kelly Mena directed and edited for B&H Photo 8 years ago.
I met Mel while I was producing educational content for B&H Photo Event Space and Depth of Field conferences, platforming him many times. His wisdom was infectious, his sense of humor legendary, but it was his seemingly effortless ability to capture photographs that really amazed me. Mel was an inspiration to work with, and I reflect fondly when he came to teach on the many stages we invited him to. I am deeply grateful that we recorded his wisdom so that all may learn and enjoy the many lessons of the great Melchior DiGiacomo.
Mel’s B&H Video LibraryClick on the Image to link to the video on YouTube
The Feral Photographer
This one hour video drips with wisdom about living the life of a photographer. Mel discusses visual literacy, career advice and how to be invisible when shooting.
Wedding Photography Tips: Mel DiGiacomo on Photojournalistic Approach
An absolute must watch short video for any and all wedding/event photographers.
So You Want to be a Sports Photographer?
Priceless advice and techniques for being a sports photographer.
Wedding Event of the Season: Mel DiGiacomo Session
Before there was B&H Depth of Field, there was the Wedding Event of the Season and we invited Mel to speak to 1000 lucky wedding photographers.
Everyone has Mel stories and I’ll share one that stands out for me. When he’d drive in from NJ to NYC to conduct presentations or review sessions, he’d drive his big Cadillac across the river. I’d have to meet him on the street and get him parked which could be a few blocks away. As we walked to the B&H Super Store he kept his Canon EOS 5D MK III and 24mm in his hands casually snapping away at what ever drew his eye. Arms extended, shooting from hip and shoulder Mel just banged out gorgeous B&W street shots effortlessly, sometimes stopping to talk to a stranger or engage with a coffee counter person. The only thing that excedded Mel’s lust for life and image making that was his wit and sense of humor. Mel was loved by all those who came in his circle.
Tom Tedesco, Mel, Neil Clipper and David Brommer at the Wedding Event of the Season 2017 Photo by Brandon Remler
Mel was important member of the pro tennis world. He covered the US Open for decades and was the only non tennis player admitted into the hall of fame! I asked fellow a photographer who I knew worked with Mel, Chris Nicholson (one of the four founders of National Parks at Nigh) about some Mel stories to share.
“My very first experience with Mel was from a distance. Part of my first job with Tennis magazine was managing the photo library. Part of that responsibility was sorting and filing a gigantic batch of Mel’s photos that he let us keep on hand. I learned a lot about how to shoot sports in a different way by seeing thousands of his images as a young adult. That definitely influenced my growth as a sports photographer.
The first time I ever met Mel in person was at a tennis tournament in New Jersey. I was in awe shooting next to him and a few other photographers I respected, what we might call the old guard of tennis photographers, the people who were there when tennis started getting big in the late 60s, and who documented the sport as it grew through the boom in the 70s and into the 80s and 90s. Most sports photographers, including tennis photographers, sit at the sideline with a long lens and shoot repeatedly, looking for the best few photos they can manage to capture out of a few hundred frames by the end of the match. Mel, on the other hand, sat at the side of the court with a rangefinder, picking it up only every few minutes or so to snap one artistic wide-angle black-and-white. It was a good lesson, that there is more than one way to work, particularly if you want to make art out of a common commercial genre. He was shooting with a rangefinder one-handed, mind you.” -Chris Nicolson
When news spread about Mel’s passing there was a great outpouring of love from the local NY Metro area photographers on social media. Mel lives on in his images, memories and those golden Youtube videos above.
God Speed Mel and thank you for being the unabashed and talented you.
Lastly, I’d like to share my favorite Mel joke,
“What’s the difference between a Pizza Pie and a Professional Photographer?”
The Pizza Pie can feed a family of four”
Mel DiGiacomo 1938-2024
Additional Reading:
This is taken from the Eastern Tennis Hall of Fame when Mel was inducted in 2015.
MEL DIGIACOMO
Mel DiGiacomo has been a staple at the US Open for the last 44 years.
Whether it is down on the court, in the stands or directly alongside the players, DiGiacomo is there with his camera in hand. In addition to the US Open, DiGiacomo has traveled the world to photograph a variety of sports and events.
The North Bergen, N.J. native currently lives in Harrington Park, N.J.. where he has proudly resided for the last 40 years. “It’s remarkable that Harrington Park, a 4,800 person town, has two residents in the Eastern Tennis Hall of Fame,” DiGiacomo said. “Neil Amdur, the former Sports Editor for The New York Times and me.”
DiGiacomo began his career at CBS as an usher and worked his way up to Production Supervisor for “60 Minutes.” After working for CBS for ten years, he decided to become a photographer when he was 27 years old. “My friend photographed my semi-pro football practices on the weekends and I always made fun of his photos,” DiGiacomo said. One day, he joked if you’re so good, get a camera,’ so I bought one, put it together and told him that’s what I wanted to do with the rest of my life.”
A year later, DiGiacomo moved to England to photograph rugby, then moved back to the United States and photographed hockey at Madison Square Garden. “A publisher hired me to make a hockey book,” DiGiacomo said. *Gene Scott, Founder of Tennis Week magazine, saw it and wanted the same thing, only for tennis.” DiGiacomo didn’t play tennis and, at the time, had never seen a tennis match. As someone who was familiar photographing football, DiGiacomo began shooting tennis matches with a football lens. The different lens gave him a now perspective on the game, which made him take photos in a way no one else did.
“In those days, you could get close to the players,” DiGiacomo said. “I used to shoot everything in black and white and in a very photo-journalist style, which was another thing people hadn’t been doing.”
DiGiacomo’s photos have been featured in several publications including Sports Illustrated, Tennis Magazine, Newsweek and Lite Magazine. His new style of shooting and vivacious personality greatly influenced his fellow photographers. “He’s a wonderful person to be around because he is so friendly.” Bob Litwin, a close friend of DiGiacomo’s said. “Even with really famous people he becomes a friend, not just a photographer.”
Throughout DiGiacomo’s time at the Virginia Slims Circuit and US Open, he interacted with several professional players, writers and fans including Billie Jean King, Chris Evert, Jimmy Connors, Arthur Ashe, Martina Navratilova and Mary Carillo. Outside of sports, DiGiacomo photographed a number of weddings, specifically tennis weddings. The first wedding he shot was Jeanie Brinkman’s, the Director of the Virginia Slims Circuit.
“I didn’t think too much of it,” DiGiacomo said. “Then, 20 years later, I was asked to shoot Jimmy Connors’ Manager Karen Scott’$ wedding, and more stemmed from there.” Pam Shriver, a former professional player, Richard Evans, a longtime tennis writer and Gone Scott each requested DiGiacomo for their big day.
DiGiacomo values all of his work, but is most proud of the impact he has made in Antigua photographing the tennis tournament at Curtain Bluff. In his first year shooting there, he noticed the ball boys and girls had bare feet, so he followed them home to their village, Old Road. “I ended up doing a book that had nothing to do with tennis, but also had everything to do with tennis,” DiGiacomo said. *I was down there for tennis, but I went into the village to document their stories.”
The proceeds from DiGiacomo’s photographs go into the “Old Road Fund” to benefit the children in the village. When the fund earns enough money. it goes toward helping the children attend college. DiGincomo has always supported tennis and the people he has met through tennis. He raised both of his children to become tennis players because he values being part of the tennis community and enjoys that tennis is a sport his kids, who are now adults, can play for years to come.
“I owe a lot to tennis because it changed my life,” DiGiacomo said. “It has given me so much, my family too.”